Fine-tuning for classification 2. Setup Model And Prepare Loss Calcutation
Initializing a model with pretrained weights
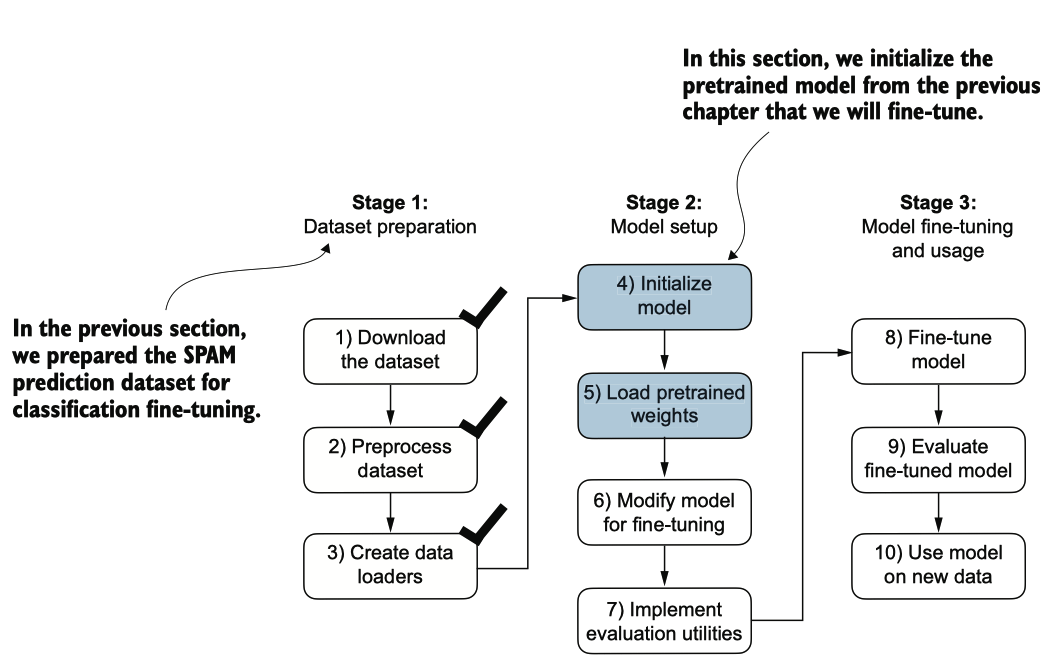
图6.8 三阶段过程用于对LLM进行分类微调。
为了开始模型准备过程,我们采用与预训练无标签数据时相同的配置:
CHOOSE_MODEL = "gpt2-small (124M)"
INPUT_PROMPT = "Every effort moves"

BASE_CONFIG = {
    "vocab_size": 50257,     # Vocabulary size
    "context_length": 1024,  # Context length
    "drop_rate": 0.0,        # Dropout rate
    "qkv_bias": True         # Query-key-value bias
}

model_configs = {
    "gpt2-small (124M)": {"emb_dim": 768, "n_layers": 12, "n_heads": 12},
    "gpt2-medium (355M)": {"emb_dim": 1024, "n_layers": 24, "n_heads": 16},
    "gpt2-large (774M)": {"emb_dim": 1280, "n_layers": 36, "n_heads": 20},
    "gpt2-xl (1558M)": {"emb_dim": 1600, "n_layers": 48, "n_heads": 25},
}

BASE_CONFIG.update(model_configs[CHOOSE_MODEL])

assert train_dataset.max_length <= BASE_CONFIG["context_length"], (
    f"Dataset length {train_dataset.max_length} exceeds model's context "
    f"length {BASE_CONFIG['context_length']}. Reinitialize data sets with "
    f"`max_length={BASE_CONFIG['context_length']}`"
)
接下来,我们从 gptdownload.py 文件中导入 downloadandloadgpt2 函数,并重用预 训练中的 GPTModel 类和 loadweightsinto_gpt 函数,将下载的权重加 载到 GPT 模型中。
from gpt_download import download_and_load_gpt2
from previous_chapters import GPTModel, load_weights_into_gpt

model_size = CHOOSE_MODEL.split(" ")[-1].lstrip("(").rstrip(")")
settings, params = download_and_load_gpt2(model_size=model_size, models_dir="gpt2")

model = GPTModel(BASE_CONFIG)
load_weights_into_gpt(model, params)
model.eval();
在将模型权重加载到GPTModel之后,我们重新使用文本生成工具函数,以确保模型生成连贯的文本
from previous_chapters import (
    generate_text_simple,
    text_to_token_ids,
    token_ids_to_text
)

text_1 = "Every effort moves you"

token_ids = generate_text_simple(
    model=model,
    idx=text_to_token_ids(text_1, tokenizer),
    max_new_tokens=15,
    context_size=BASE_CONFIG["context_length"]
)

print(token_ids_to_text(token_ids, tokenizer))

## output
Every effort moves you forward.

The first step is to understand the importance of your work
在我们开始将模型微调为垃圾邮件分类器之前,让我们看看模型是否已经通过指令对垃圾邮件进行分类
text_2 = (
    "Is the following text 'spam'? Answer with 'yes' or 'no':"
    " 'You are a winner you have been specially"
    " selected to receive $1000 cash or a $2000 award.'"
)

token_ids = generate_text_simple(
    model=model,
    idx=text_to_token_ids(text_2, tokenizer),
    max_new_tokens=23,
    context_size=BASE_CONFIG["context_length"]
)

print(token_ids_to_text(token_ids, tokenizer))

## output
Is the following text 'spam'? Answer with 'yes' or 'no': 'You are a winner you have been specially selected to receive $1000 cash or a $2000 award.'

The following text 'spam'? Answer with 'yes' or 'no': 'You are a winner
根据输出,显然模型在遵循指令方面存在困难。这个结果是可以预期的,因为它只经 过了预训练,并缺乏指令微调。因此,让我们为分类微调准备模型。
Adding a classification head
我们必须修改预训练的大型语言模型(LLM),以准备其进行分类微调。为此,我们 将原始输出层替换为一个更小的输出层,该层将隐藏表示映射到两个类别:0(“非 垃圾邮件”)和1(“垃圾邮件”),如图6.9所示。我们使用与之前相同的模型,除了替换输出层。
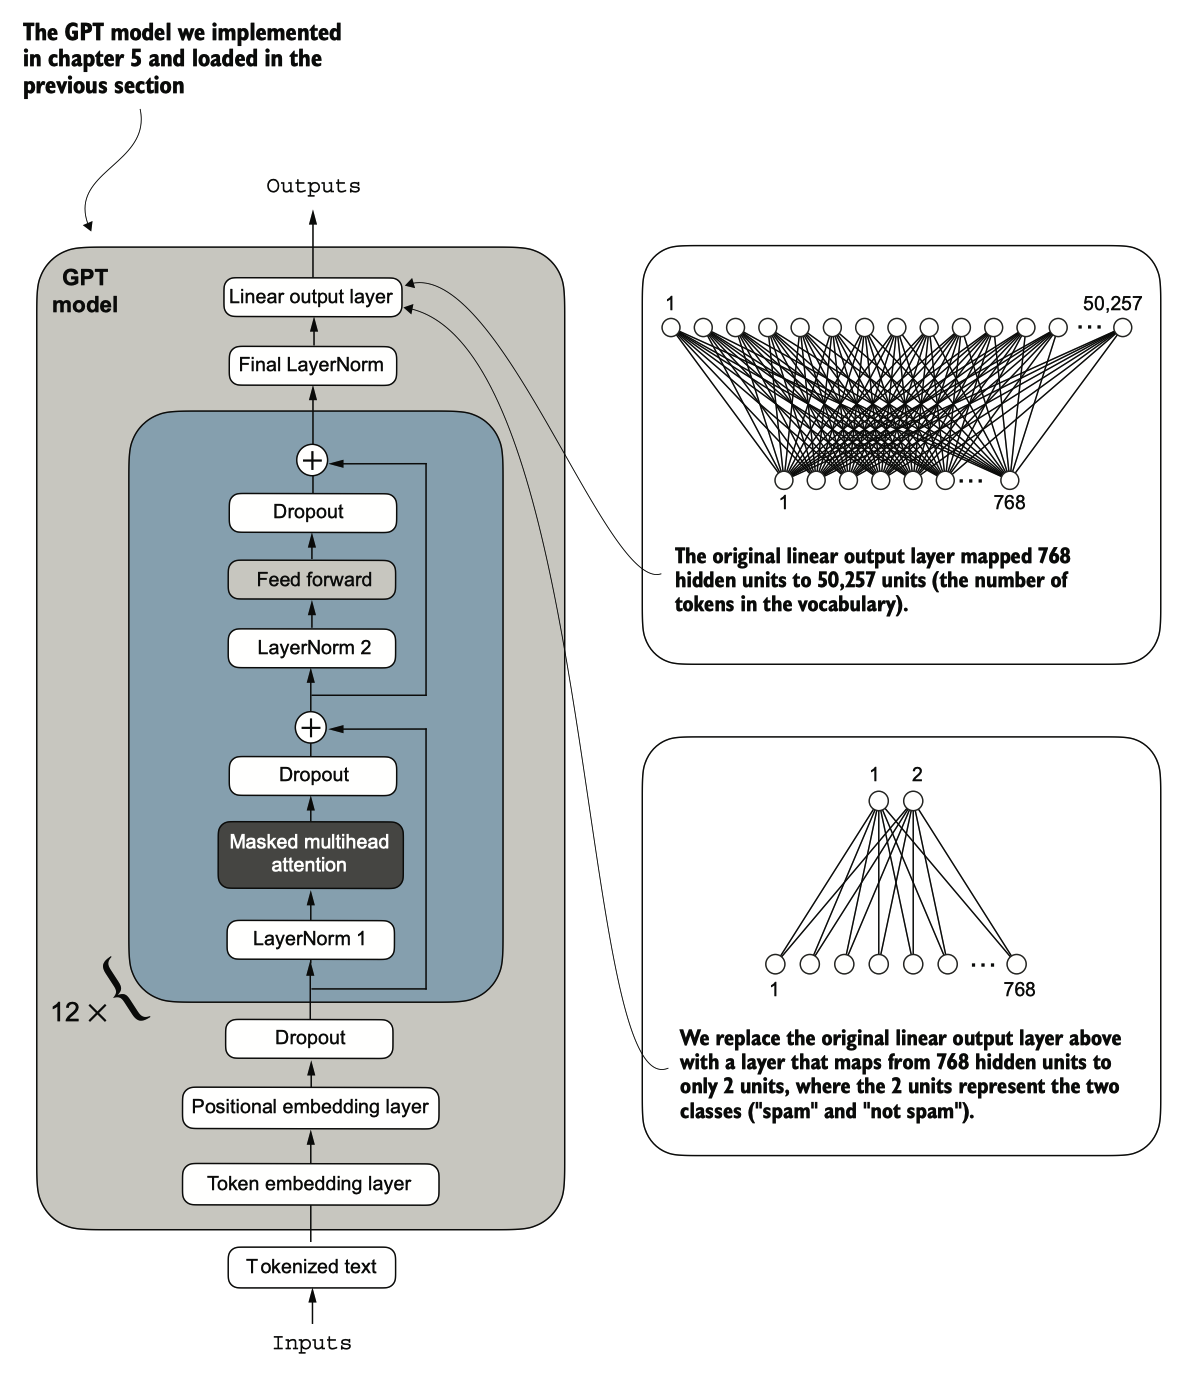
图 6.9 通过改变其架构来调整 GPT 模型以进行垃圾邮件分类。最初,模型的线性输出层将768个隐藏单元映射到50,2 57个词汇。为了检测垃圾邮件,我们用一个新的输出层替换这个层,该层将相同的768个隐藏单元映射到仅两个类 别,分别表示“垃圾邮件”和“非垃圾邮件”。
[!NOTE] 输出层节点
从技术上讲,我们可以使用一个输出节点,因为我们正在处理二元分类任务。然而 ,这将需要修改损失函数。因此,我们选择一个更通用的方法 ,其中输出节点的数量与类别的数量相匹配。例如,对于一个三类问题,例如将新闻文章分类为“技术”、“体育”或“政治”,我们将使用三个输出节点,依此类推。
在我们尝试图6.9中所示的修改之前,让我们通过print(model)打印模型架构:
print(model)

## output
GPTModel(
  (tok_emb): Embedding(50257, 768)
  (pos_emb): Embedding(1024, 768)
  (drop_emb): Dropout(p=0.0, inplace=False)
  (trf_blocks): Sequential(
    (0): TransformerBlock(
      (att): MultiHeadAttention(
        (W_query): Linear(in_features=768, out_features=768, bias=True)
        (W_key): Linear(in_features=768, out_features=768, bias=True)
        (W_value): Linear(in_features=768, out_features=768, bias=True)
        (out_proj): Linear(in_features=768, out_features=768, bias=True)
        (dropout): Dropout(p=0.0, inplace=False)
      )
      (ff): FeedForward(
        (layers): Sequential(
          (0): Linear(in_features=768, out_features=3072, bias=True)
          (1): GELU()
          (2): Linear(in_features=3072, out_features=768, bias=True)
        )
      )
      (norm1): LayerNorm()
      (norm2): LayerNorm()
      (drop_resid): Dropout(p=0.0, inplace=False)
    )
    (1): TransformerBlock(
      (att): MultiHeadAttention(
        (W_query): Linear(in_features=768, out_features=768, bias=True)
        (W_key): Linear(in_features=768, out_features=768, bias=True)
        (W_value): Linear(in_features=768, out_features=768, bias=True)
        (out_proj): Linear(in_features=768, out_features=768, bias=True)
        (dropout): Dropout(p=0.0, inplace=False)
      )
      (ff): FeedForward(
        (layers): Sequential(
          (0): Linear(in_features=768, out_features=3072, bias=True)
          (1): GELU()
          (2): Linear(in_features=3072, out_features=768, bias=True)
        )
      )
      (norm1): LayerNorm()
      (norm2): LayerNorm()
      (drop_resid): Dropout(p=0.0, inplace=False)
    )
    (2): TransformerBlock(
      (att): MultiHeadAttention(
        (W_query): Linear(in_features=768, out_features=768, bias=True)
        (W_key): Linear(in_features=768, out_features=768, bias=True)
        (W_value): Linear(in_features=768, out_features=768, bias=True)
        (out_proj): Linear(in_features=768, out_features=768, bias=True)
        (dropout): Dropout(p=0.0, inplace=False)
      )
      (ff): FeedForward(
        (layers): Sequential(
          (0): Linear(in_features=768, out_features=3072, bias=True)
          (1): GELU()
          (2): Linear(in_features=3072, out_features=768, bias=True)
        )
      )
      (norm1): LayerNorm()
      (norm2): LayerNorm()
      (drop_resid): Dropout(p=0.0, inplace=False)
    )
    (3): TransformerBlock(
      (att): MultiHeadAttention(
        (W_query): Linear(in_features=768, out_features=768, bias=True)
        (W_key): Linear(in_features=768, out_features=768, bias=True)
        (W_value): Linear(in_features=768, out_features=768, bias=True)
        (out_proj): Linear(in_features=768, out_features=768, bias=True)
        (dropout): Dropout(p=0.0, inplace=False)
      )
      (ff): FeedForward(
        (layers): Sequential(
          (0): Linear(in_features=768, out_features=3072, bias=True)
          (1): GELU()
          (2): Linear(in_features=3072, out_features=768, bias=True)
        )
      )
      (norm1): LayerNorm()
      (norm2): LayerNorm()
      (drop_resid): Dropout(p=0.0, inplace=False)
    )
    (4): TransformerBlock(
      (att): MultiHeadAttention(
        (W_query): Linear(in_features=768, out_features=768, bias=True)
        (W_key): Linear(in_features=768, out_features=768, bias=True)
        (W_value): Linear(in_features=768, out_features=768, bias=True)
        (out_proj): Linear(in_features=768, out_features=768, bias=True)
        (dropout): Dropout(p=0.0, inplace=False)
      )
      (ff): FeedForward(
        (layers): Sequential(
          (0): Linear(in_features=768, out_features=3072, bias=True)
          (1): GELU()
          (2): Linear(in_features=3072, out_features=768, bias=True)
        )
      )
      (norm1): LayerNorm()
      (norm2): LayerNorm()
      (drop_resid): Dropout(p=0.0, inplace=False)
    )
    (5): TransformerBlock(
      (att): MultiHeadAttention(
        (W_query): Linear(in_features=768, out_features=768, bias=True)
        (W_key): Linear(in_features=768, out_features=768, bias=True)
        (W_value): Linear(in_features=768, out_features=768, bias=True)
        (out_proj): Linear(in_features=768, out_features=768, bias=True)
        (dropout): Dropout(p=0.0, inplace=False)
      )
      (ff): FeedForward(
        (layers): Sequential(
          (0): Linear(in_features=768, out_features=3072, bias=True)
          (1): GELU()
          (2): Linear(in_features=3072, out_features=768, bias=True)
        )
      )
      (norm1): LayerNorm()
      (norm2): LayerNorm()
      (drop_resid): Dropout(p=0.0, inplace=False)
    )
    (6): TransformerBlock(
      (att): MultiHeadAttention(
        (W_query): Linear(in_features=768, out_features=768, bias=True)
        (W_key): Linear(in_features=768, out_features=768, bias=True)
        (W_value): Linear(in_features=768, out_features=768, bias=True)
        (out_proj): Linear(in_features=768, out_features=768, bias=True)
        (dropout): Dropout(p=0.0, inplace=False)
      )
      (ff): FeedForward(
        (layers): Sequential(
          (0): Linear(in_features=768, out_features=3072, bias=True)
          (1): GELU()
          (2): Linear(in_features=3072, out_features=768, bias=True)
        )
      )
      (norm1): LayerNorm()
      (norm2): LayerNorm()
      (drop_resid): Dropout(p=0.0, inplace=False)
    )
    (7): TransformerBlock(
      (att): MultiHeadAttention(
        (W_query): Linear(in_features=768, out_features=768, bias=True)
        (W_key): Linear(in_features=768, out_features=768, bias=True)
        (W_value): Linear(in_features=768, out_features=768, bias=True)
        (out_proj): Linear(in_features=768, out_features=768, bias=True)
        (dropout): Dropout(p=0.0, inplace=False)
      )
      (ff): FeedForward(
        (layers): Sequential(
          (0): Linear(in_features=768, out_features=3072, bias=True)
          (1): GELU()
          (2): Linear(in_features=3072, out_features=768, bias=True)
        )
      )
      (norm1): LayerNorm()
      (norm2): LayerNorm()
      (drop_resid): Dropout(p=0.0, inplace=False)
    )
    (8): TransformerBlock(
      (att): MultiHeadAttention(
        (W_query): Linear(in_features=768, out_features=768, bias=True)
        (W_key): Linear(in_features=768, out_features=768, bias=True)
        (W_value): Linear(in_features=768, out_features=768, bias=True)
        (out_proj): Linear(in_features=768, out_features=768, bias=True)
        (dropout): Dropout(p=0.0, inplace=False)
      )
      (ff): FeedForward(
        (layers): Sequential(
          (0): Linear(in_features=768, out_features=3072, bias=True)
          (1): GELU()
          (2): Linear(in_features=3072, out_features=768, bias=True)
        )
      )
      (norm1): LayerNorm()
      (norm2): LayerNorm()
      (drop_resid): Dropout(p=0.0, inplace=False)
    )
    (9): TransformerBlock(
      (att): MultiHeadAttention(
        (W_query): Linear(in_features=768, out_features=768, bias=True)
        (W_key): Linear(in_features=768, out_features=768, bias=True)
        (W_value): Linear(in_features=768, out_features=768, bias=True)
        (out_proj): Linear(in_features=768, out_features=768, bias=True)
        (dropout): Dropout(p=0.0, inplace=False)
      )
      (ff): FeedForward(
        (layers): Sequential(
          (0): Linear(in_features=768, out_features=3072, bias=True)
          (1): GELU()
          (2): Linear(in_features=3072, out_features=768, bias=True)
        )
      )
      (norm1): LayerNorm()
      (norm2): LayerNorm()
      (drop_resid): Dropout(p=0.0, inplace=False)
    )
    (10): TransformerBlock(
      (att): MultiHeadAttention(
        (W_query): Linear(in_features=768, out_features=768, bias=True)
        (W_key): Linear(in_features=768, out_features=768, bias=True)
        (W_value): Linear(in_features=768, out_features=768, bias=True)
        (out_proj): Linear(in_features=768, out_features=768, bias=True)
        (dropout): Dropout(p=0.0, inplace=False)
      )
      (ff): FeedForward(
        (layers): Sequential(
          (0): Linear(in_features=768, out_features=3072, bias=True)
          (1): GELU()
          (2): Linear(in_features=3072, out_features=768, bias=True)
        )
      )
      (norm1): LayerNorm()
      (norm2): LayerNorm()
      (drop_resid): Dropout(p=0.0, inplace=False)
    )
    (11): TransformerBlock(
      (att): MultiHeadAttention(
        (W_query): Linear(in_features=768, out_features=768, bias=True)
        (W_key): Linear(in_features=768, out_features=768, bias=True)
        (W_value): Linear(in_features=768, out_features=768, bias=True)
        (out_proj): Linear(in_features=768, out_features=768, bias=True)
        (dropout): Dropout(p=0.0, inplace=False)
      )
      (ff): FeedForward(
        (layers): Sequential(
          (0): Linear(in_features=768, out_features=3072, bias=True)
          (1): GELU()
          (2): Linear(in_features=3072, out_features=768, bias=True)
        )
      )
      (norm1): LayerNorm()
      (norm2): LayerNorm()
      (drop_resid): Dropout(p=0.0, inplace=False)
    )
  )
  (final_norm): LayerNorm()
  (out_head): Linear(in_features=768, out_features=50257, bias=False)
)
如前所述,GPTModel由嵌入层组成 ,后面跟着12个相同的 transformer blocks(仅显示最后一个块以简化),最后是一个LayerNorm和输出层out_head。
设置所有层
接下来,我们用一个新的输出层替换 out_head(见图 6.9),我们将对其进行微调。
为了使模型准备好进行分类微调,我们首先 freeze 模型,这意味着我们将所有层设置为不可训练:
for param in model.parameters():
    param.requires_grad = False
然后,我们替换输出层(model.out_head),该层最初将输入映射到50,257维度,即词 汇表的大小(见图6.9)。
torch.manual_seed(123)

num_classes = 2
model.out_head = torch.nn.Linear(in_features=BASE_CONFIG["emb_dim"], out_features=num_classes)
为了保持代码的通用性,我们使用 BASECONFIG["embdim"],在“gpt2-small (124 M)”模型中其值为 768。因此,我们也可以使用相同的代码来处理更大的 GPT-2 模型 变体。
这个新的 model.outhead 输出层的 requiresgrad 属性默认为 True,这意味着它是模 型中唯一在训练期间会被更新的层。从技术上讲,仅训练我们刚添加的输出层就足够了。然而,正如我在实验中发现的那样,微调额外的层可以显著提高模型的预测性能。我们还将最后一个 transformer 块和连接这个块与 输出层的最终 LayerNorm 模块配置为可训练,正如图 6.10 所示。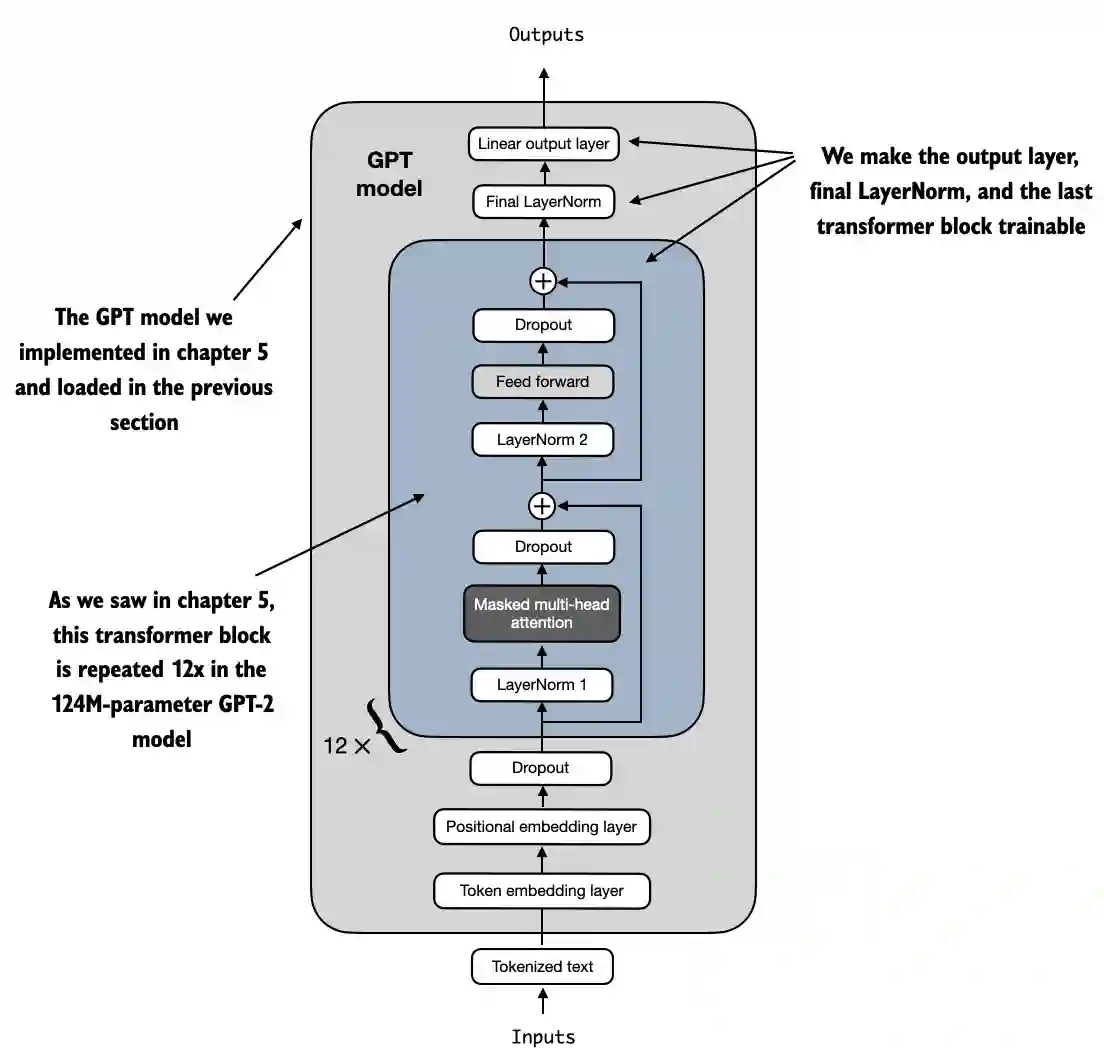
图 6.10 GPT 模型包含 12 个重复的 Transformer 块。在输出层旁边,我们将最终的 LayerNorm 和最后一个 Transforme r 块设置为可训练。其余 11 个 Transformer 块和嵌入层保持不可训练。
为了使最终的 LayerNorm 和最后的 transformer 块可训练,我们将它们各自的 requir es_grad 设置为 True:
for param in model.trf_blocks[-1].parameters():
    param.requires_grad = True

for param in model.final_norm.parameters():
    param.requires_grad = True
我们可以给它一个与我们之前使用的示例文本完全相同的示例文本:
inputs = tokenizer.encode("Do you have time")
inputs = torch.tensor(inputs).unsqueeze(0)
print("Inputs:", inputs)
print("Inputs dimensions:", inputs.shape) # shape: (batch_size, num_tokens)

## output
Inputs: tensor([[5211,  345,  423,  640]])
Inputs dimensions: torch.Size([1, 4])
打印输出显示,前面的代码将输入编码为一个由四个输入标记组成的张量,然后,我们可以像往常一样将编码后的令牌 ID 传递给模型:
with torch.no_grad():
    outputs = model(inputs)

print("Outputs:\n", outputs)
print("Outputs dimensions:", outputs.shape) # shape: (batch_size, num_tokens, num_classes)

## output
Outputs:
 tensor([[[-1.5854,  0.9904],
         [-3.7235,  7.4548],
         [-2.2661,  6.6049],
         [-3.5983,  3.9902]]])
Outputs dimensions: torch.Size([1, 4, 2])
微调
请记住,我们的目标是微调这个模型,以返回一个类标签,指示模型输入是“垃圾 邮件”还是“非垃圾邮件”。我们不需要微调所有四个输出行;相反,我们可以专注 于一个单独的输出标记。特别地,我们将关注最后一行,对应于最后一个输出标记, 如图6.11所示。
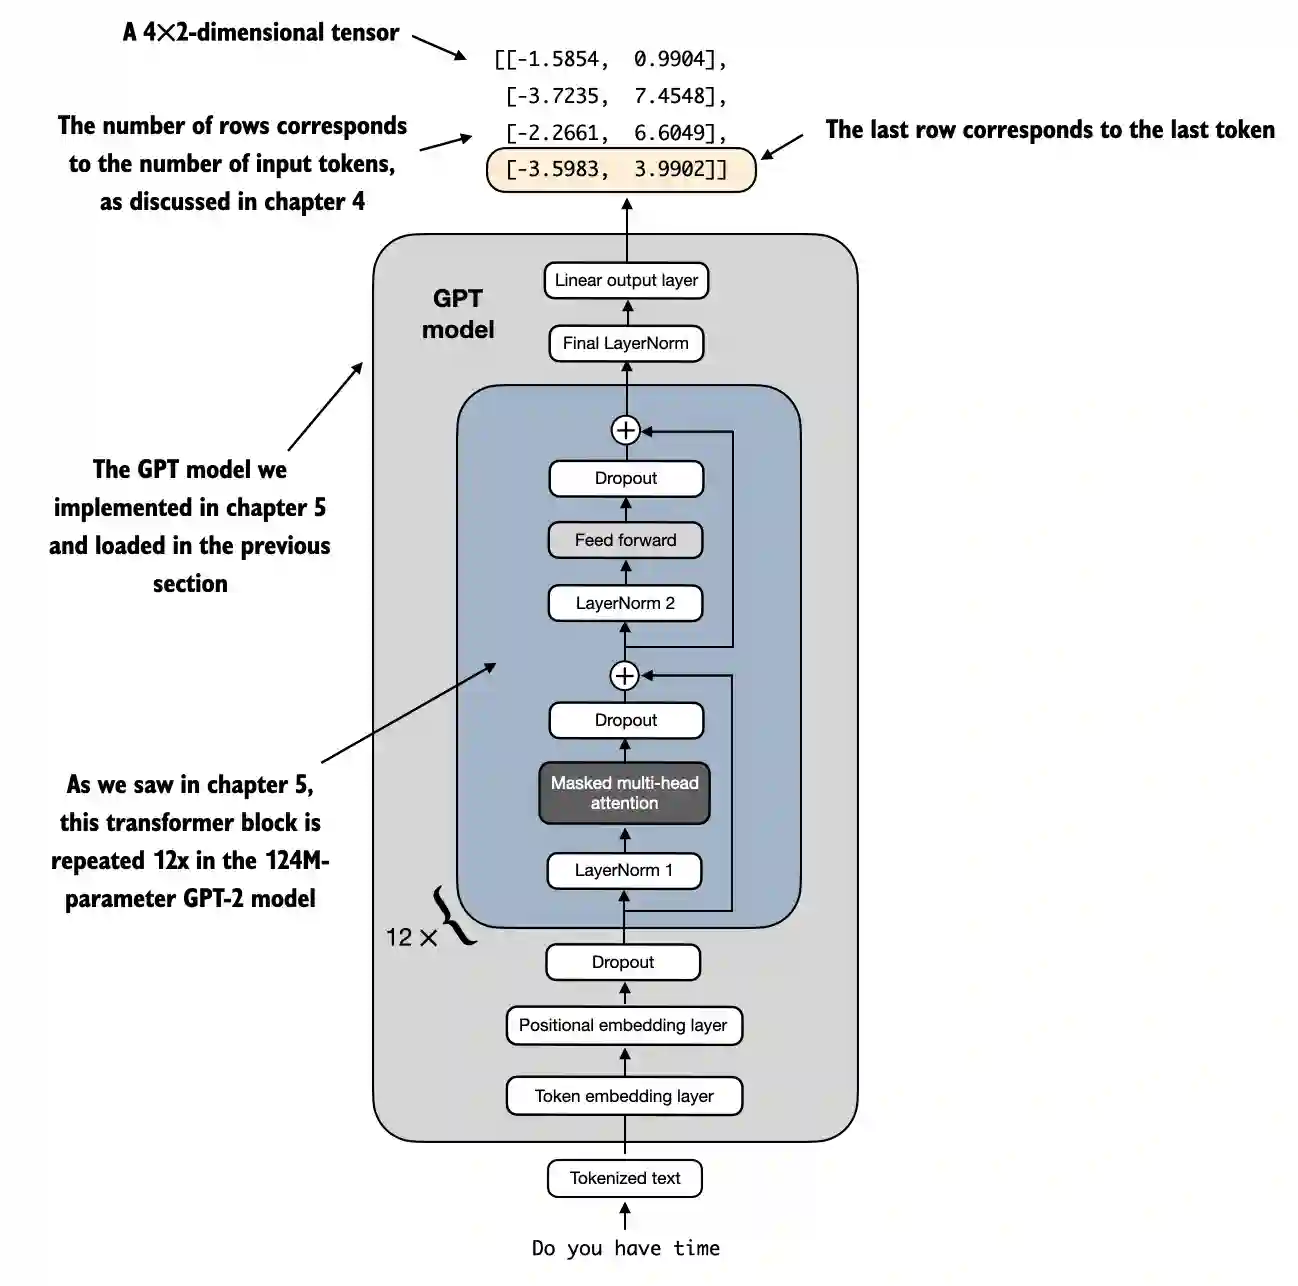
图 6.11 GPT 模型的四个标记示例输入和输出。由于修改了输出层,输出张量由两列组成。我们只对最后 一行感兴趣,该行对应于在对模型进行垃圾邮件分类微调时的最后一个标记。
要从输出张量中提取最后一个输出令牌,我们使用以下代码:
print("Last output token:", outputs[:, -1, :])

## output
Last output token: tensor([[-3.5983,  3.9902]])
我们仍然需要将值转换为类标签预测。但首先,让我们理解一下为何我们特别关注最后一个输出标记。
我们已经探讨了注意力机制,它在每个输入令牌与其他每个输入令牌之间建立了关 系,以及在类似于GPT的模型中常用的causal attention mask的概念。这个掩码限制了一个将令牌的焦点放置于当前位置信息及其之前的信息,确保每个令牌仅能受到自身及前面令牌的影响,如图6.12所示。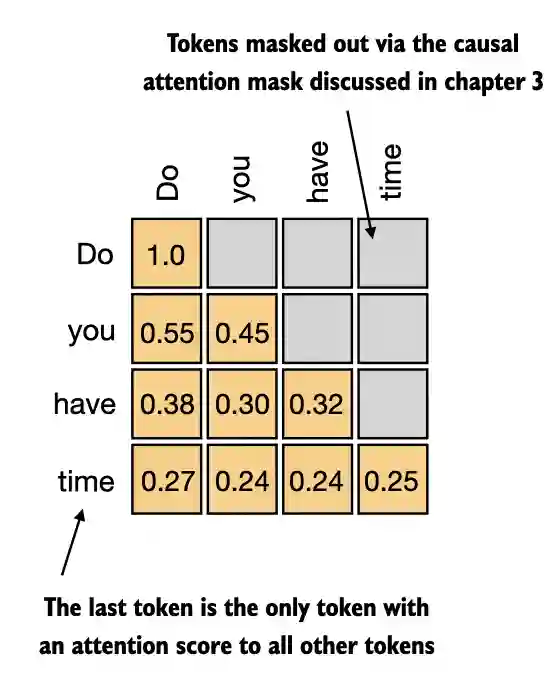
图 6.12 因果注意力机制,其中输入 token 之间 的注意力分数以矩阵格式显示。
根据图6.12中的因果注意力掩码设置,序列中的最后一个标记积累了最多的信息,因 为它是唯一一个可以访问所有先前标记数据的标记。因此,在我们的垃圾邮件分类任 务中,我们在微调过程中关注这个最后的标记。
我们现在准备将最后一个标记转换为类别标签预测,并计算模型的初始预测准确性 。随后,我们将对模型进行微调,以执行垃圾邮件分类任务。
Calculating the classification loss and accuracy
只有一个小任务在我们微调模型之前需要完成:我们必须实现微调过程中使用的模型 评估函数,如图6.13所示。

图 6.13 用于分类微调 LLM 的三阶段过程。
在实现评估工具之前,让我们简要讨论一下如何将模型输出转换为类别标签预测。 我们之前通过将50,257个输出通过softmax函数转换为概率,然后通过argmax函数返回 最高概率的位置,计算了LLM生成的下一个令牌的令牌ID。我们在这里采用相同的方 法来计算模型对于给定输入输出“垃圾邮件”或“非垃圾邮件”预测,如图6.14所示。唯一的区别是我们使用的是2维而不是50,257维的输出。
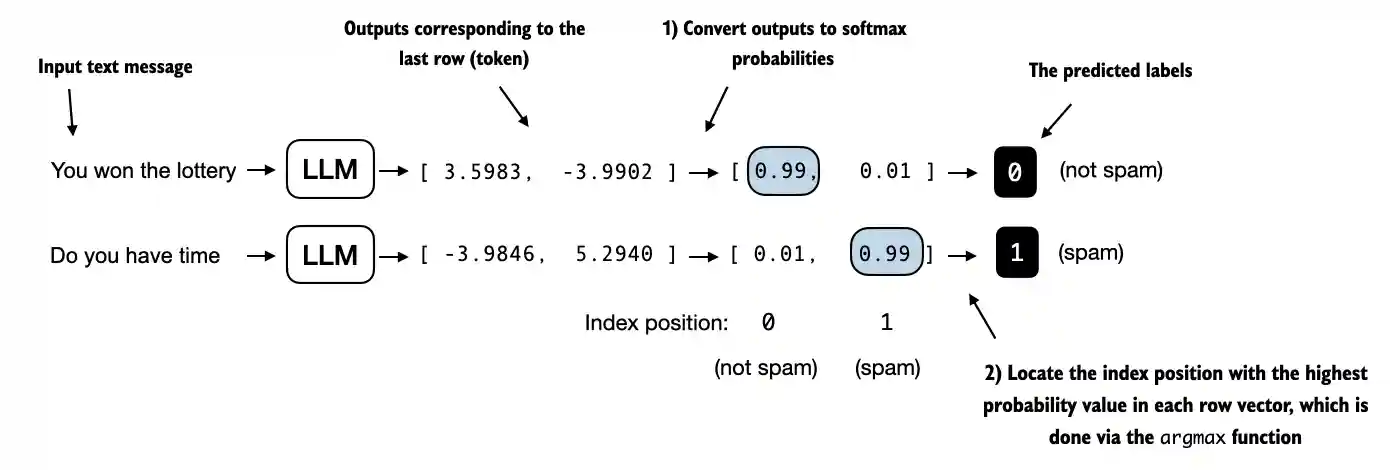
图 6.14 模型输出对应于最后一个标记的概率分数被转换为每个输入文本的分类标签。
让我们考虑使用一个具体示例的最后一个标记输出:
print("Last output token:", outputs[:, -1, :])

## output
Last output token: tensor([[-3.5983,  3.9902]])
我们可以获得类别标签:
probas = torch.softmax(outputs[:, -1, :], dim=-1)
label = torch.argmax(probas)
print("Class label:", label.item())

## output
Class label: 1
在这种情况下,代码返回1,这意味着模型预测输入文本是“垃圾邮件”。在这里使 用softmax函数是可选的,因为最大输出直接对应于最高概率分数。因此,我们可以简 化代码而不使用softmax:
logits = outputs[:, -1, :]
label = torch.argmax(logits)
print("Class label:", label.item())

## output
Class label: 1
这个概念可以用来计算分类准确率,它衡量的是数据集中正确预测的百分比。
正确率测试
为了确定分类准确性,我们将基于argmax的预测代码应用于数据集中的所有示例, 并通过定义calcaccuracyloader函数来计算正确预测的比例。
def calc_accuracy_loader(data_loader, model, device, num_batches=None):
    model.eval()
    correct_predictions, num_examples = 0, 0

    if num_batches is None:
        num_batches = len(data_loader)
    else:
        num_batches = min(num_batches, len(data_loader))
    for i, (input_batch, target_batch) in enumerate(data_loader):
        if i < num_batches:
            input_batch, target_batch = input_batch.to(device), target_batch.to(device)

            with torch.no_grad():
                logits = model(input_batch)[:, -1, :]  # Logits of last output token
            predicted_labels = torch.argmax(logits, dim=-1)

            num_examples += predicted_labels.shape[0]
            correct_predictions += (predicted_labels == target_batch).sum().item()
        else:
            break
    return correct_predictions / num_examples
让我们使用该函数来确定从10个批次估算的不同数据集的分类准确性,以提高效率:
device = torch.device("cuda" if torch.cuda.is_available() else "cpu")

# Note:
# Uncommenting the following lines will allow the code to run on Apple Silicon chips, if applicable,
# which is approximately 2x faster than on an Apple CPU (as measured on an M3 MacBook Air).
# As of this writing, in PyTorch 2.4, the results obtained via CPU and MPS were identical.
# However, in earlier versions of PyTorch, you may observe different results when using MPS.

#if torch.cuda.is_available():
#    device = torch.device("cuda")
#elif torch.backends.mps.is_available():
#    device = torch.device("mps")
#else:
#    device = torch.device("cpu")
#print(f"Running on {device} device.")

model.to(device) # no assignment model = model.to(device) necessary for nn.Module classes

torch.manual_seed(123) # For reproducibility due to the shuffling in the training data loader

train_accuracy = calc_accuracy_loader(train_loader, model, device, num_batches=10)
val_accuracy = calc_accuracy_loader(val_loader, model, device, num_batches=10)
test_accuracy = calc_accuracy_loader(test_loader, model, device, num_batches=10)

print(f"Training accuracy: {train_accuracy*100:.2f}%")
print(f"Validation accuracy: {val_accuracy*100:.2f}%")
print(f"Test accuracy: {test_accuracy*100:.2f}%")

## output
Training accuracy: 46.25%
Validation accuracy: 45.00%
Test accuracy: 48.75%
损失函数计算
正如我们所看到的,预测准确率接近随机预测,在这种情况下将是50%。为了提高预 测准确率,我们需要微调模型。
然而,在我们开始对模型进行微调之前,我们必须定义在训练期间要优化的损失函 数。我们的目标是最大化模型的垃圾邮件分类准确性,这意味着前面的代码应该输出 正确的类别标签:0表示非垃圾邮件,1表示垃圾邮件。
因为分类准确率不是一个可微分的函数,我们使用交叉熵损失作为一种代理来最大化准确率。因此,calclossbatch 函数保持不变,只做了一个调整:我们专注于优化 仅最后一个 token,即 model(inputbatch)[:, -1, :],而不是所有 token,即 model(inputb atch):
def calc_loss_batch(input_batch, target_batch, model, device):
    input_batch, target_batch = input_batch.to(device), target_batch.to(device)
    logits = model(input_batch)[:, -1, :]  # Logits of last output token
    loss = torch.nn.functional.cross_entropy(logits, target_batch)
    return loss
我们使用 calclossbatch 函数来计算从之前定义的数据加载器获得的单个批次的损失 。为了计算数据加载器中所有批次的损失,我们定义了 calclossloader 函数,如之前所示。
def calc_loss_loader(data_loader, model, device, num_batches=None):
    total_loss = 0.
    if len(data_loader) == 0:
        return float("nan")
    elif num_batches is None:
        num_batches = len(data_loader)
    else:
        # Reduce the number of batches to match the total number of batches in the data loader
        # if num_batches exceeds the number of batches in the data loader
        num_batches = min(num_batches, len(data_loader))
    for i, (input_batch, target_batch) in enumerate(data_loader):
        if i < num_batches:
            loss = calc_loss_batch(input_batch, target_batch, model, device)
            total_loss += loss.item()
        else:
            break
    return total_loss / num_batches
类似于计算训练准确度,我们现在为每个数据集计算初始损失:
with torch.no_grad(): # Disable gradient tracking for efficiency because we are not training, yet
    train_loss = calc_loss_loader(train_loader, model, device, num_batches=5)
    val_loss = calc_loss_loader(val_loader, model, device, num_batches=5)
    test_loss = calc_loss_loader(test_loader, model, device, num_batches=5)

print(f"Training loss: {train_loss:.3f}")
print(f"Validation loss: {val_loss:.3f}")
print(f"Test loss: {test_loss:.3f}")

## output
Training loss: 2.453
Validation loss: 2.583
Test loss: 2.322
接下来,我们将实现一个训练函数来微调模型,这意味着调整模型以最小化训练集损 失。最小化训练集损失将有助于提高分类准确性,这也是我们的总体目标。