Fine-tuning to follow instructions 1. Prepare dataset and Create data loader
现在我们将实施微调LLM以遵循人类指令的过程,如图7.1所示。 指令微调是开发用于聊天机器人应用、个人助理和其他对话任务的LLM的一项主要技术。

图 7.1 编码 LLM 的三个主要阶段。
Introduction
我们现在知道,预训练LLM涉及一个训练过程,它学习一次生成一个单词。生成的预 训练LLM能够text completion,这意味着它可以在给定片段作为输入的情况下完成句子 或撰写文本段落。
然而,预训练的LLM通常难以处理特定的指令,例如“修正这段文 字的语法”或“将这段文字转换为被动语态。”稍后,我们将研究一个具体的例子, 在该例子中我们将加载预训练LLM作为instruction fine-tuning的基础,也被称为 supervised instruction fine-tuning。
在这里,我们专注于提高LLM遵循此类指令和生成所需响应的能力,如图7.2所示 。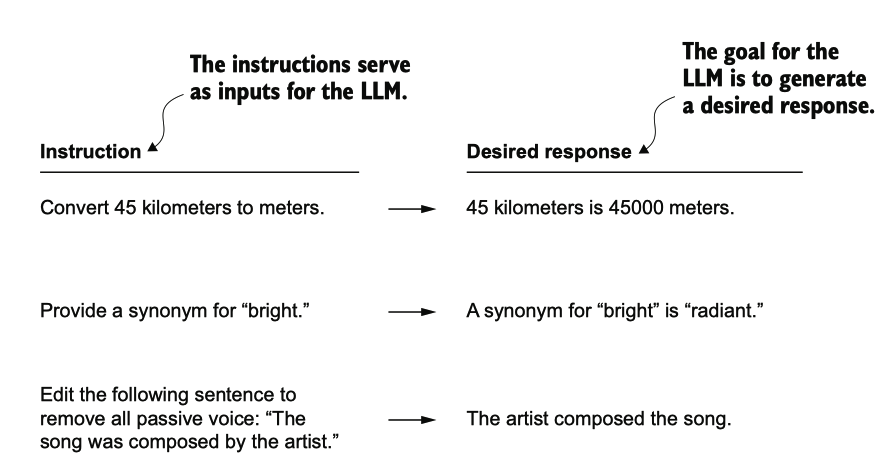
图 7.2 由 LLM 处理以生成所需响应的指令示例
准备数据集是指令微调的关键方面。然后,我们将完成指令微调过程三个阶段的所 有步骤,从数据集准备开始,如图7.3所示。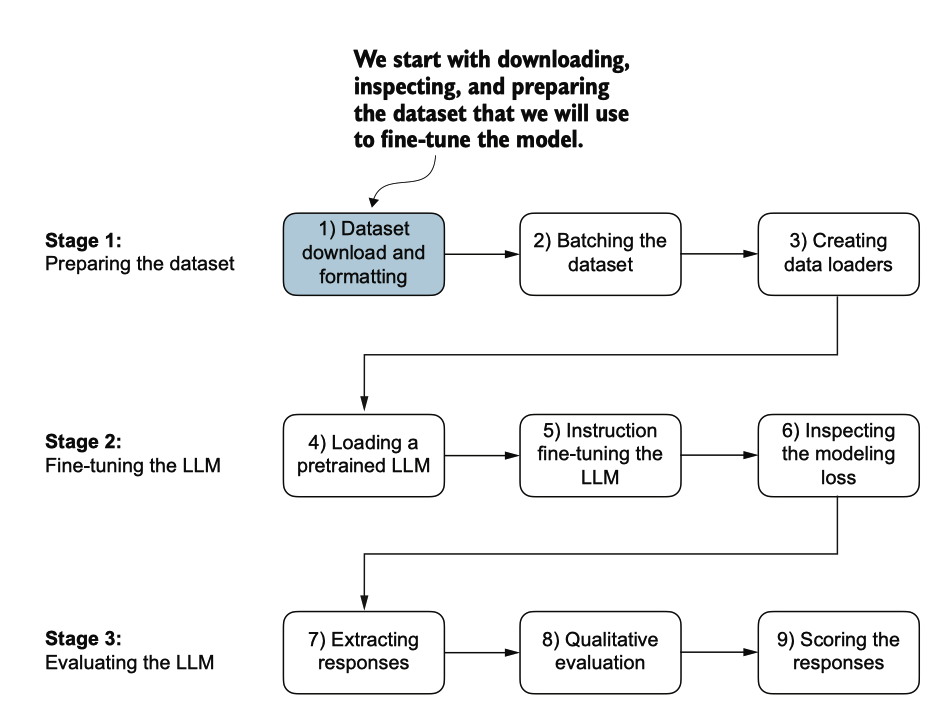
图 7.3 大型语言模型的三阶段微调过程。
Preparing a dataset for supervised instruction
让我们下载并格式化用于对预训练 LLM 进行指令微调的指令数据集。该数据集包含 1100 instruction–response pairs,类似于图 7.2 中的内容。
以下代码实现并执行一个函数,以下载此数据集,该数据集是一个相对较小的文件 (仅 204 KB),采用 JSON 格式。JSON,即 JavaScript 对象表示法,镜像了 Python 字典的结构,提供了一种简单的数据交换结构,既方便人类阅读又易于机器处理。
import json
import os
import urllib

def download_and_load_file(file_path, url):

    if not os.path.exists(file_path):
        with urllib.request.urlopen(url) as response:
            text_data = response.read().decode("utf-8")
        with open(file_path, "w", encoding="utf-8") as file:
            file.write(text_data)

    # The book originally contained this unnecessary "else" clause:
    #else:
    #    with open(file_path, "r", encoding="utf-8") as file:
    #        text_data = file.read()

    with open(file_path, "r", encoding="utf-8") as file:
        data = json.load(file)

    return data

file_path = "instruction-data.json"
url = (
    "https://raw.githubusercontent.com/rasbt/LLMs-from-scratch"
    "/main/ch07/01_main-chapter-code/instruction-data.json"
)

data = download_and_load_file(file_path, url)
print("Number of entries:", len(data))

## output
Number of entries: 1100
从 JSON 文件加载的数据列表包含 1,100 条指令数据集的条目。让我们打印其中一个 条目,以查看每个条目的结构:
print("Example entry:\n", data[50])

## output
Example entry:
 {'instruction': 'Identify the correct spelling of the following word.', 'input': 'Ocassion', 'output': "The correct spelling is 'Occasion.'"}
正如我们所看到的,示例条目是包含“指令”、“输入”和“输出”的Python字典对 象。让我们再看另一个例子:
print("Another example entry:\n", data[999])

## output
Another example entry:
 {'instruction': "What is an antonym of 'complicated'?", 'input': '', 'output': "An antonym of 'complicated' is 'simple'."}
根据此条目的内容,'输入'字段可能偶尔为空.
Format input
指令微调涉及在一个数据集上训练模型,其中输入-输出对像我们从 JSON 文件中提取的那样被明确提供。有多种方法可以将这些条目格式化为 LLM。图 7.4 说明了两种不同的示例格式。通常称为 prompt styles,用于知名 LLM(大型语言模型)的训练,如 Alpaca 和 Phi-3。

图 7.4 LLMs中指令微调的提示样式比较。Alpaca样式(左侧)使用了具有定义部分的结构化格式,包括指令、输入 和响应,而Phi-3样式(右侧)则采用了更简单的格式,包含指定的 <|user|> 和 <|answer|> 标记。
本章的其余部分使用 Alpaca 提示风格,因为它是 最受欢迎的风格之一,主要是因为它帮助定义了原始微调方法。
让我们定义一个 format_input 函数,用于将数据列表中的条目转换为 Alpaca 风格的输 入格式。
def format_input(entry):
    instruction_text = (
        f"Below is an instruction that describes a task. "
        f"Write a response that appropriately completes the request."
        f"\n\n### Instruction:\n{entry['instruction']}"
    )

    input_text = f"\n\n### Input:\n{entry['input']}" if entry["input"] else ""

    return instruction_text + input_text
这个 format_input 函数接受一个字典条目作为输入,并构造一个格式化的字符串。让 我们在之前查看过的数据集条目 data[50] 上测试它:
model_input = format_input(data[50])
desired_response = f"\n\n### Response:\n{data[50]['output']}"

print(model_input + desired_response)

## output

Below is an instruction that describes a task. Write a response that appropriately completes the request.

### Instruction:
Identify the correct spelling of the following word.

### Input:
Ocassion

### Response:
The correct spelling is 'Occasion.'
请注意,如果'input'字段为空,format_input将跳过可选的### Input:部分,我们可以通 过将format_input函数应用于我们之前检查过的条目数据[data[999]]来测试这一点:
model_input = format_input(data[999])
desired_response = f"\n\n### Response:\n{data[999]['output']}"

print(model_input + desired_response)

## output

Below is an instruction that describes a task. Write a response that appropriately completes the request.

### Instruction:
What is an antonym of 'complicated'?

### Response:
An antonym of 'complicated' is 'simple'.
输出显示,具有空“输入”字段的条目在格式化输入中不包含 ### Input: 部分.
Split dataset
在我们进入下一节设置PyTorch数据加载器之前,让我们将数据集划分为训练集、验证集和测试集,这与我们在前一章中对垃圾邮件分类数据集所做的类似。以下列表展示 了我们如何计算各部分的比例。
train_portion = int(len(data) * 0.85)  # 85% for training
test_portion = int(len(data) * 0.1)    # 10% for testing
val_portion = len(data) - train_portion - test_portion  # Remaining 5% for validation

train_data = data[:train_portion]
test_data = data[train_portion:train_portion + test_portion]
val_data = data[train_portion + test_portion:]

print("Training set length:", len(train_data))
print("Validation set length:", len(val_data))
print("Test set length:", len(test_data))

## output

Training set length: 935
Validation set length: 55
Test set length: 110
成功下载并划分了数据集,并对数据集的提示格式有了清晰的理解,我们现在准备好 进行指令微调过程的核心实施。接下来,我们专注于开发构建用于微调LLM的训练批 次的方法。
Organizing data into training batches
随着我们进入指导微调过程的实施阶段,下一步,如图7.5所示,重点是有效构建训练批次。这涉及定义一种方法,以确保我们的模型在微调过程中接收格式化的训练数据 。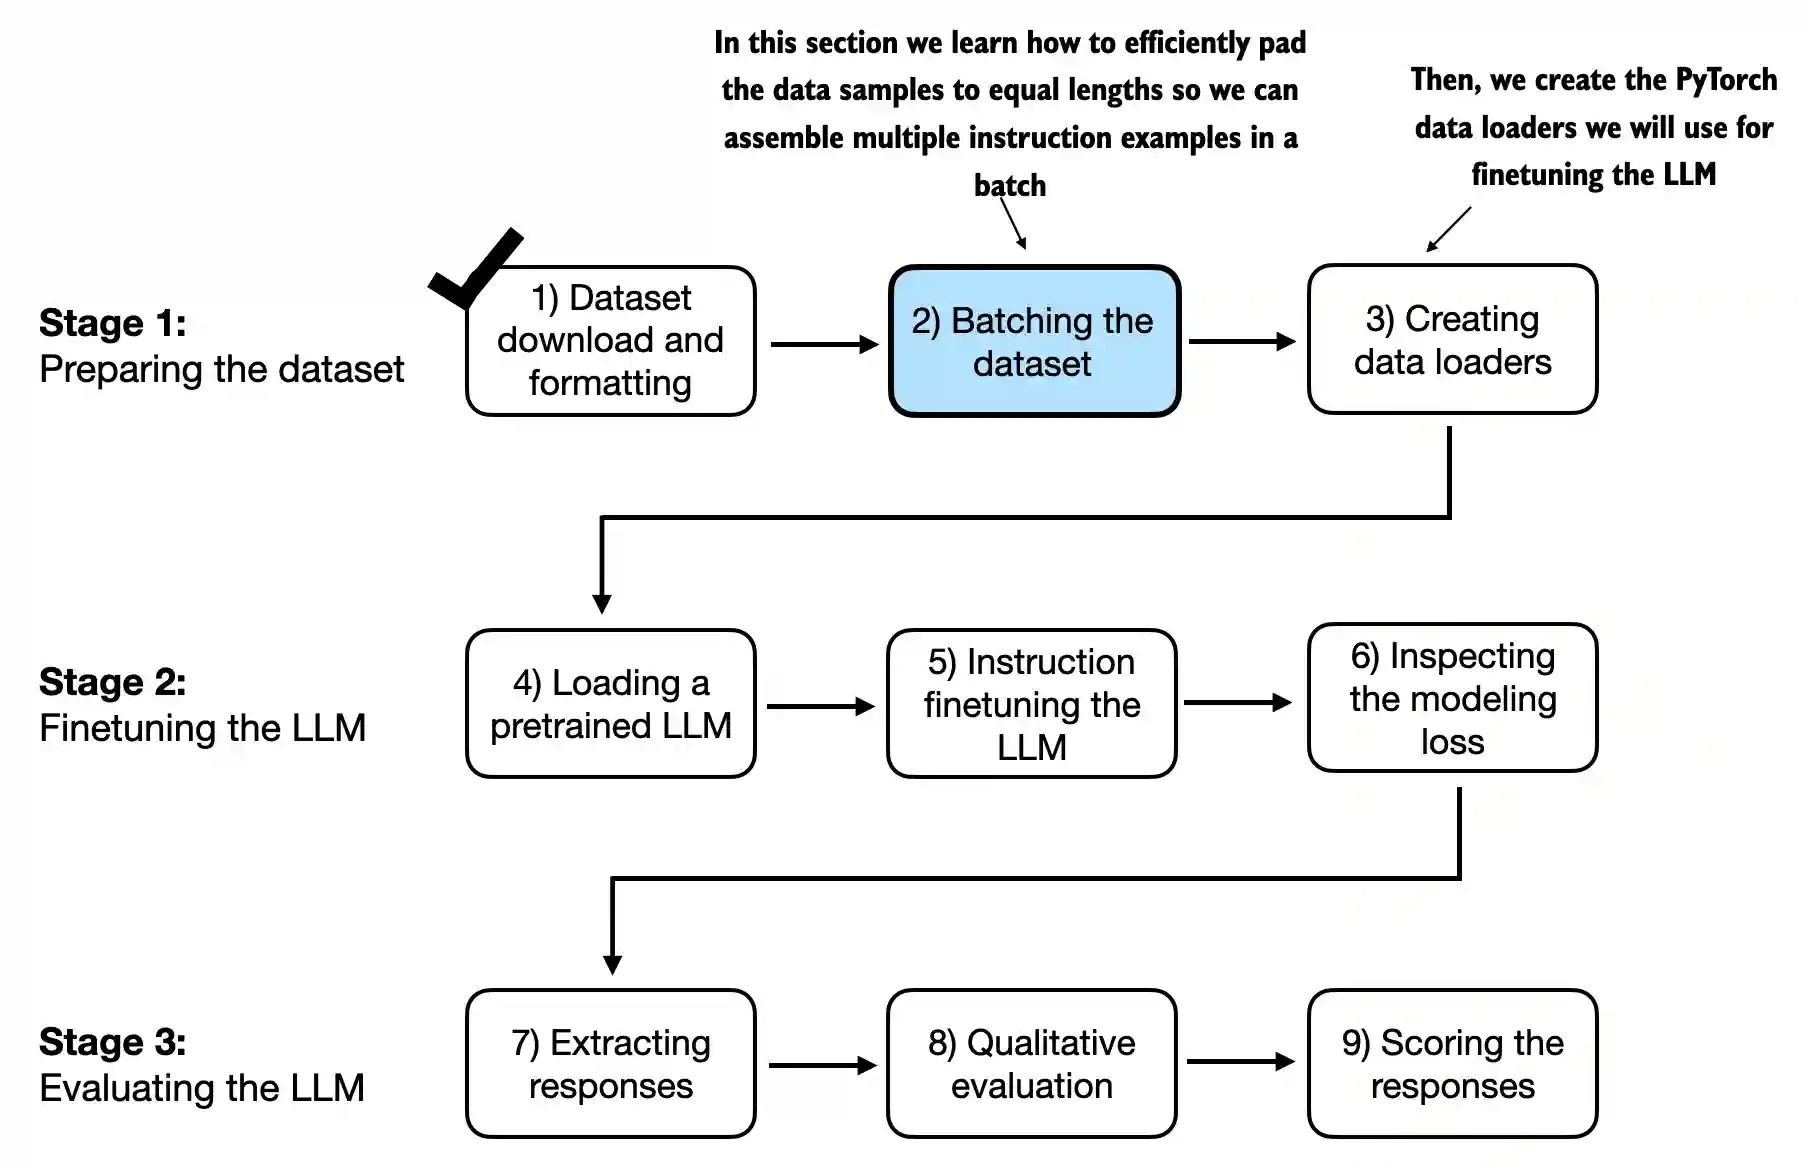
图 7.5 为 LLM 指令微调的三阶段过程。接下来,我们查看阶段 1 的第 2 步:组装训练批次。
指令微调的分批处理过程稍微复杂一些,需要我们创建自己的自定义合并函 数,然后我们将把它插入到Data Loader中。我们实现了这个自定义的合并函数,以处理我们指令微调数据集的特定要求和格式。
让我们分几个步骤来处理 batching process,包括编码自定义 collate 函数,如图 7.6 所示。首先,为了实现步骤 2.1 和 2.2,我们编码一个 InstructionDataset 类,该类对数据集中所有输入应用 format_input 和 pretokenizes.
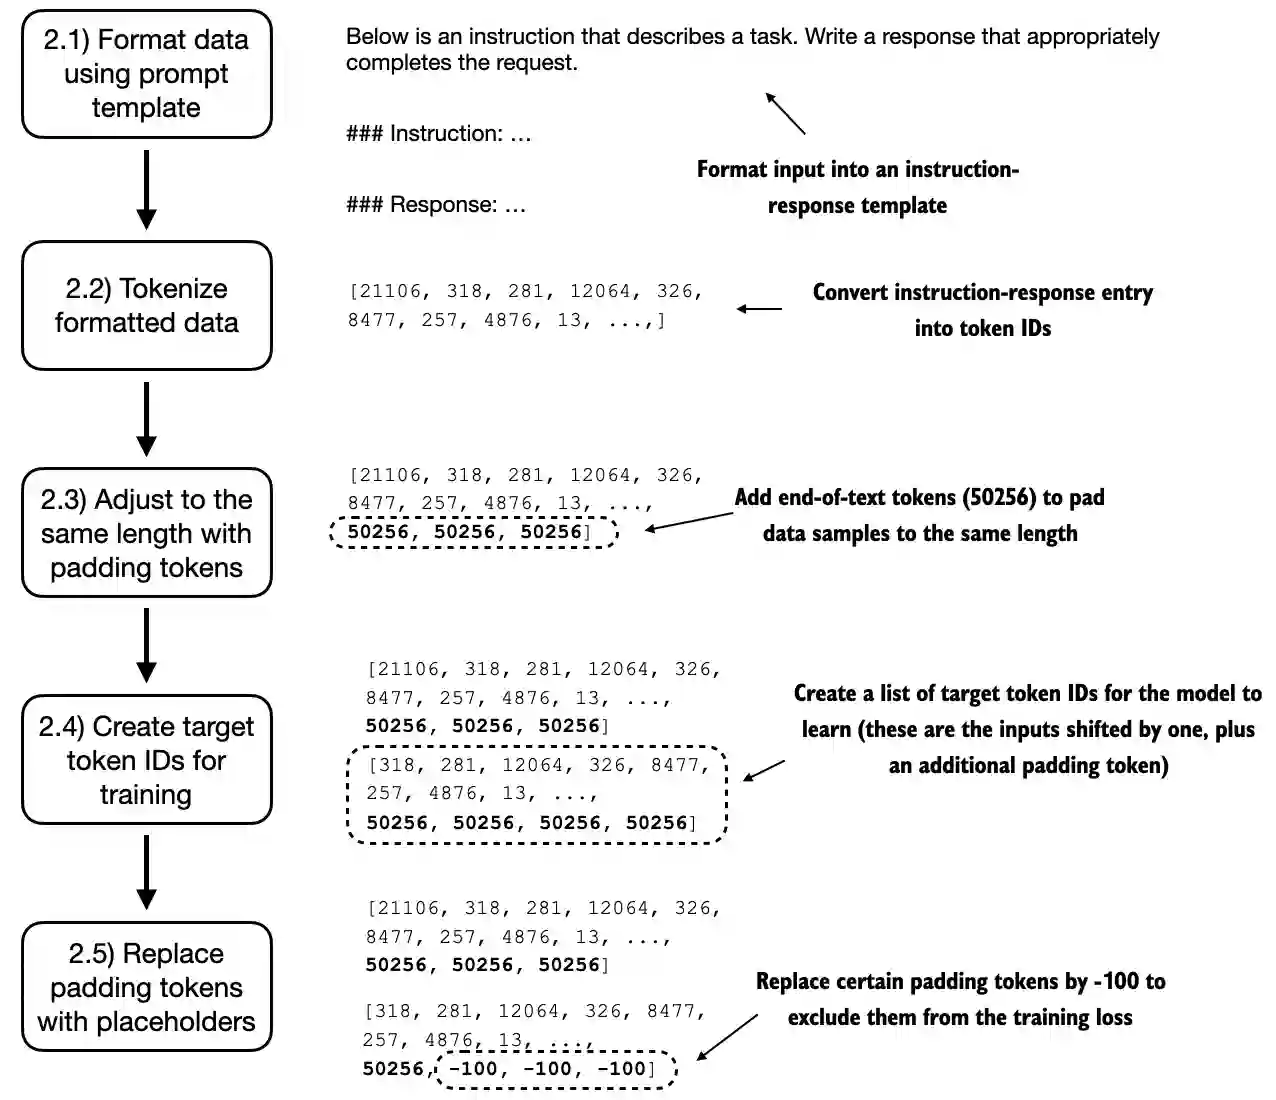
图 7.6 实施批处理过程的五个子步骤:(2.1) 应用提示模板,(2.2) 使用前几章的标记化,(2.3) 添加填 充标记,(2.4) 创建目标标记 ID,以及 (2.5) 替换 -100 占位符标记以掩盖损失函数中的填充标记。
这个两步过程,如图7.7所详细说明的,在 InstructionDataset 的 __init__ 构造方法中实现。
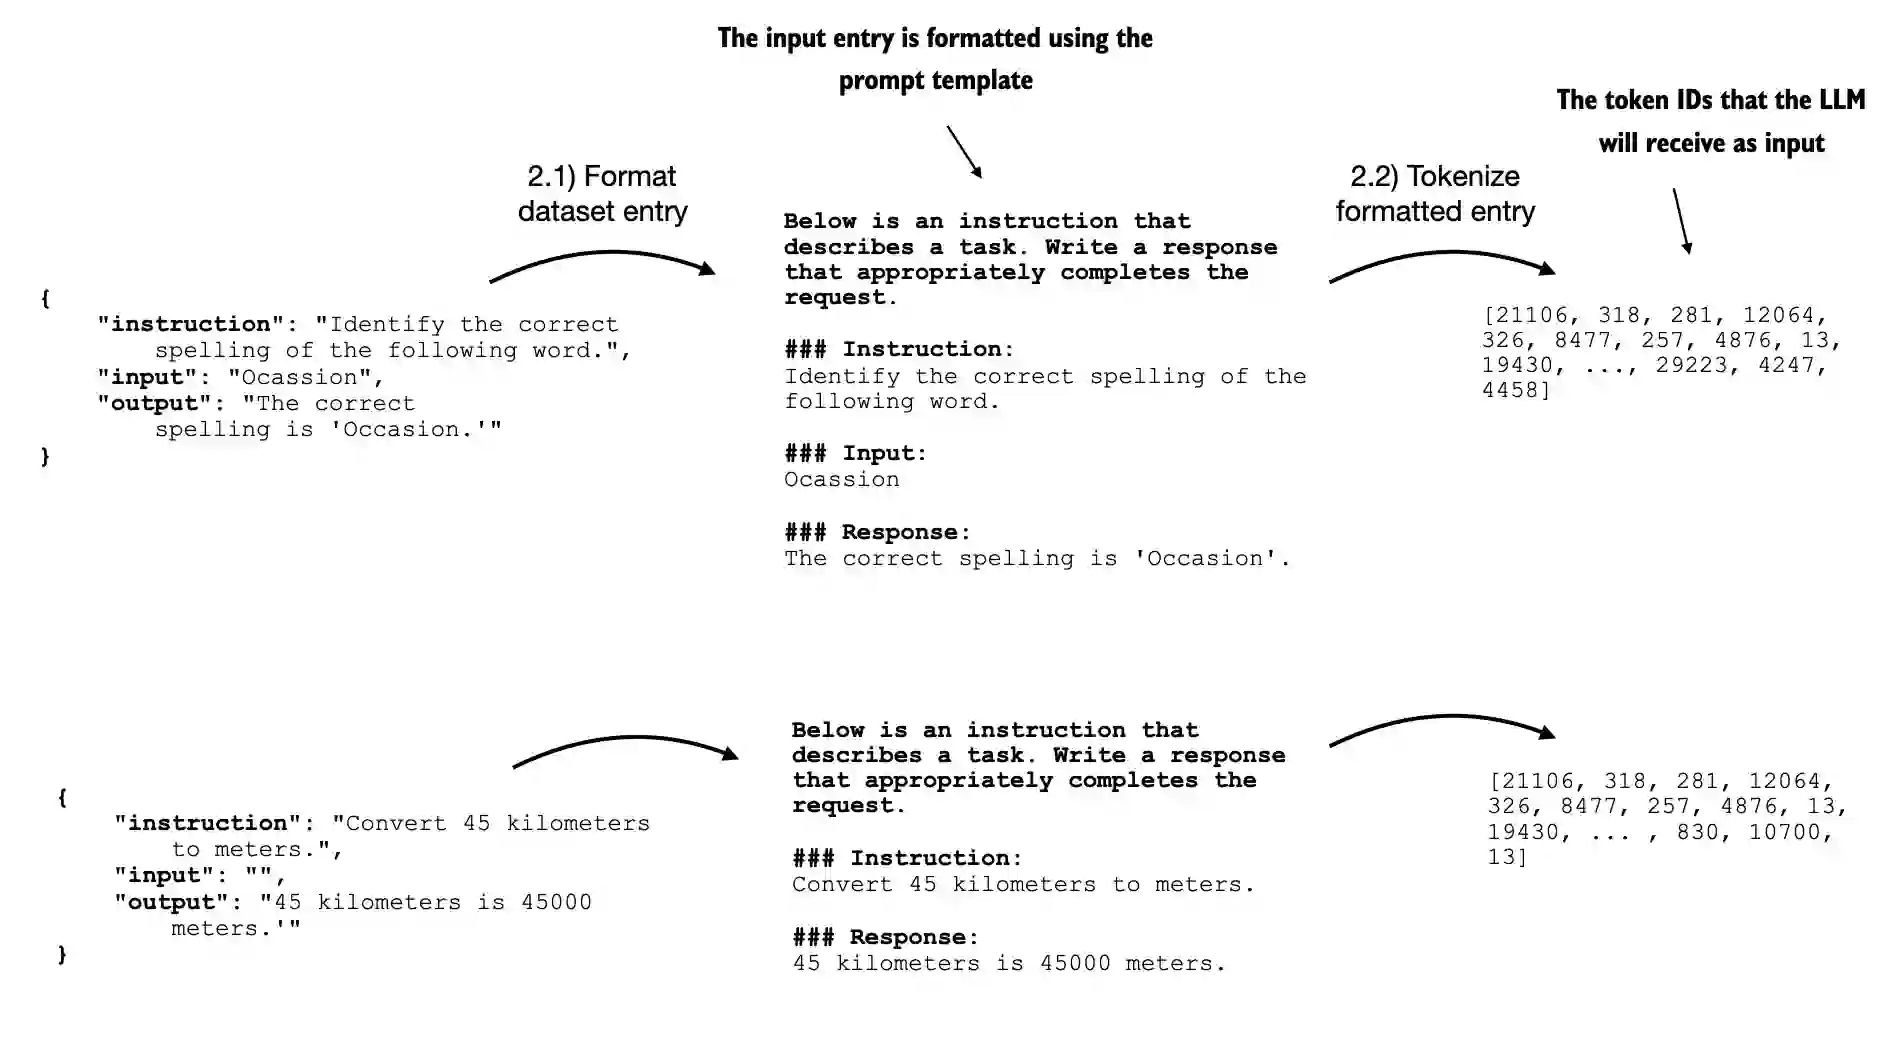
图7.7 实施批处理过程的前两个步骤。条目首先使用特定的提示模板(2.1)进行格式化,然后进行标记化(2.2), 生成模型可以处理的令牌ID序列。
import torch
from torch.utils.data import Dataset

class InstructionDataset(Dataset):
    def __init__(self, data, tokenizer):
        self.data = data

        # Pre-tokenize texts
        self.encoded_texts = []
        for entry in data:
            instruction_plus_input = format_input(entry)
            response_text = f"\n\n### Response:\n{entry['output']}"
            full_text = instruction_plus_input + response_text
            self.encoded_texts.append(
                tokenizer.encode(full_text)
            )

    def __getitem__(self, index):
        return self.encoded_texts[index]

    def __len__(self):
        return len(self.data)
Alignment Input
与分类微调中使用的方法类似,我们希望通过在一个批次中收集多个训练示例来加速 训练,这需要将所有输入填充到相似的长度。与分类微调一样,我们使用<|endoftext |>标记作为填充标记。
我们可以直接将对应于 <|endoftext|> 的令牌 ID 添加到预分词的输入中,而不是将 <|endoftext|> 令牌附加到文本输入上。我们可以在 <|endoftext|> 令牌上使用分词器的 .encode 方法,以提醒我们应该使用哪个令牌 ID:
import tiktoken
tokenizer = tiktoken.get_encoding("gpt2")

print(tokenizer.encode("<|endoftext|>", allowed_special={"<|endoftext|>"}))

## output
[50256]
进入过程的第2.3步(见图7.6),我们采用一种更复杂的方法,开发一个自定义的合并函数,以便我们可以将其传递给数据加载器。
这个自定义合并函数将每个批次中 的训练示例填充到相同的长度,同时允许不同的批次具有不同的长度,如图7.8所示。 这种方法通过仅扩展序列以匹配每个批次中最长的序列,而不是整个数据集,从而最 小化不必要的填充。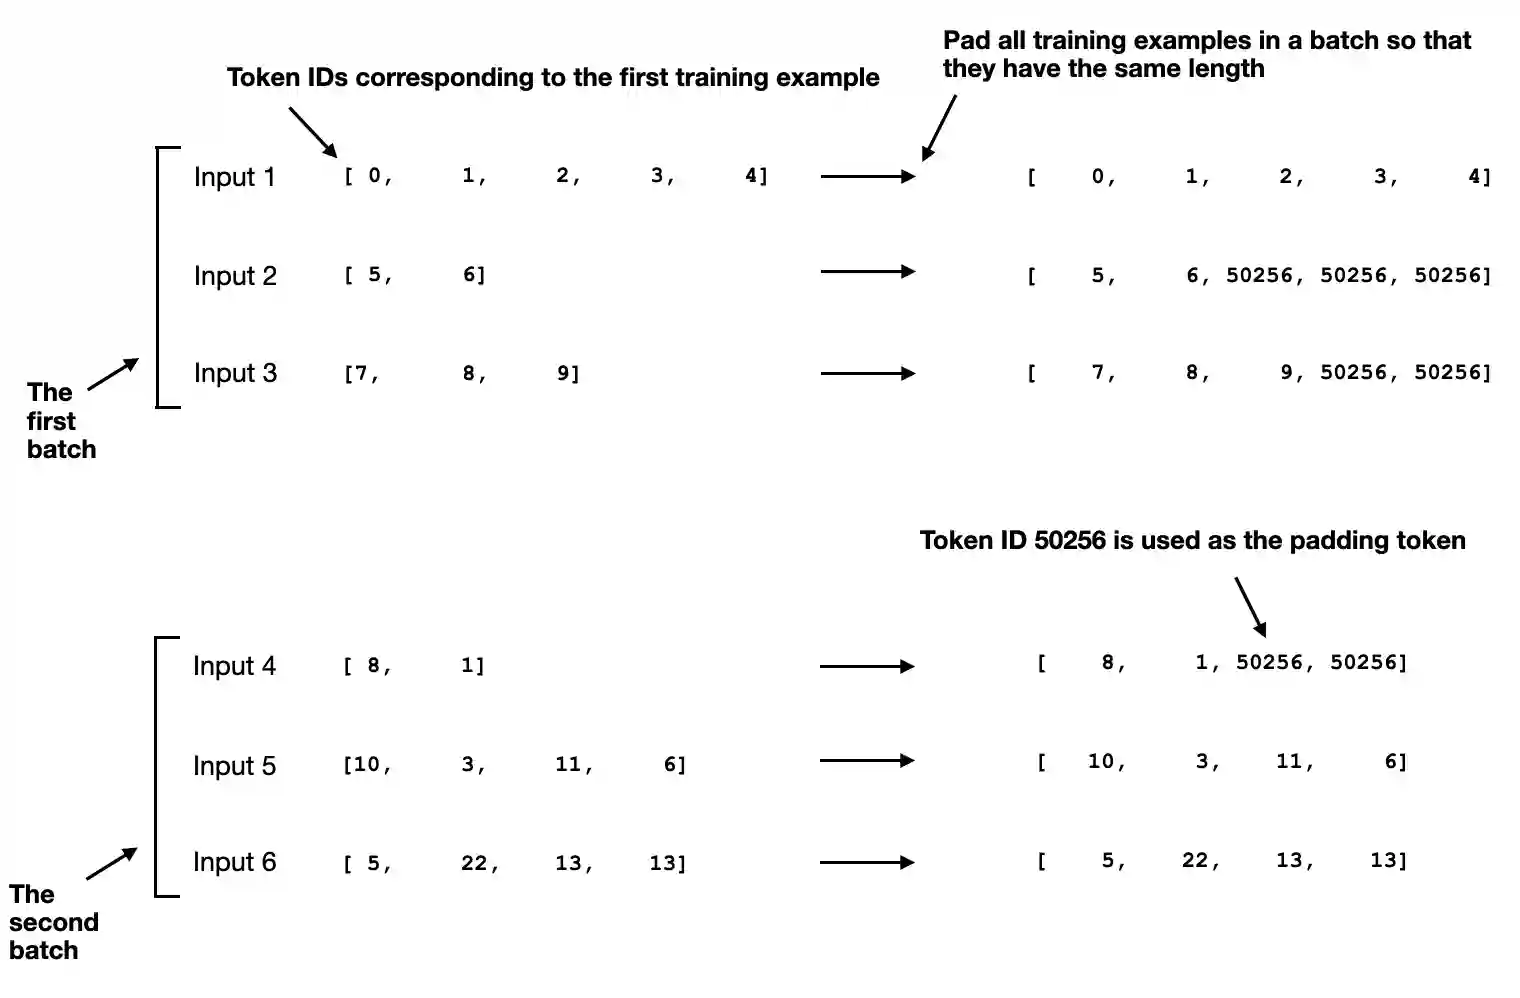
图7.8 使用令牌ID 50256 对训练示例进行填充,以确保每个批次内的统一长度。每个批次可能具有不同的长度,如 第一批和第二批所示。
我们可以通过自定义的合并函数实现填充过程.
def custom_collate_draft_1(
    batch,
    pad_token_id=50256,
    device="cpu"
):
    # Find the longest sequence in the batch
    # and increase the max length by +1, which will add one extra
    # padding token below
    batch_max_length = max(len(item)+1 for item in batch)

    # Pad and prepare inputs
    inputs_lst = []

    for item in batch:
        new_item = item.copy()
        # Add an <|endoftext|> token
        new_item += [pad_token_id]
        # Pad sequences to batch_max_length
        padded = (
            new_item + [pad_token_id] *
            (batch_max_length - len(new_item))
        )
        # Via padded[:-1], we remove the extra padded token
        # that has been added via the +1 setting in batch_max_length
        # (the extra padding token will be relevant in later codes)
        inputs = torch.tensor(padded[:-1])
        inputs_lst.append(inputs)

    # Convert list of inputs to tensor and transfer to target device
    inputs_tensor = torch.stack(inputs_lst).to(device)
    return inputs_tensor
我们实现的 custom_collate_draft_1 旨在集成到 PyTorch DataLoader 中,但它也可以作为一个独立的工具使用。
在这里,我们独立使用它来测试和验证其是否按预期工作。 让我们试一下三个不同的输入,我们希望将其组装成一个批次,且每个示例都填充到相同的长度:
inputs_1 = [0, 1, 2, 3, 4]
inputs_2 = [5, 6]
inputs_3 = [7, 8, 9]

batch = (
    inputs_1,
    inputs_2,
    inputs_3
)

print(custom_collate_draft_1(batch))

## output
tensor([[    0,     1,     2,     3,     4],
        [    5,     6, 50256, 50256, 50256],
        [    7,     8,     9, 50256, 50256]])
此输出显示所有输入已填充至最长输入列表 inputs_1 的长度,该列表包含五个标记 ID 。
Alignment Target
我们刚刚实现了第一个自定义归并函数,以从输入列表中创建批次。然而,正如 们之前所学,我们还需要创建与输入 ID 批次对应的目标 token ID。
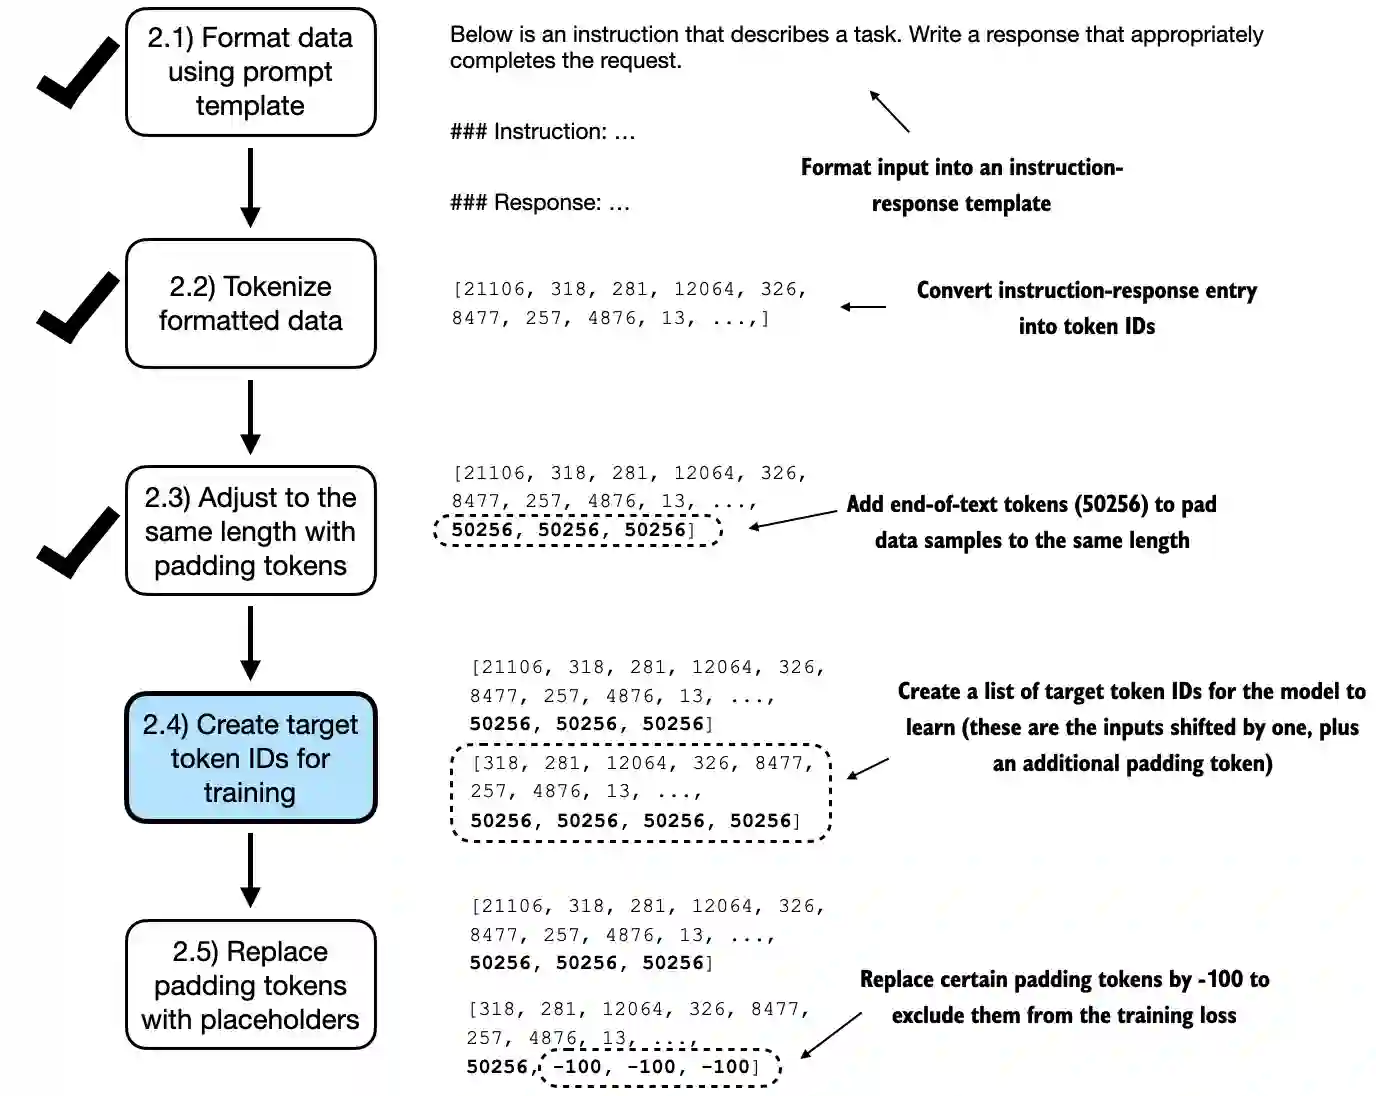
图 7.9 实现批处理过程所涉及的五个子步骤。现在我们关注第 2.4 步,目标令牌 ID 的创建。此步骤至关 重要,因为它使模型能够学习和预测所需生成的令牌。
正如图 7.9 所示, 这些目标 ID 至关重要,因为它们代表了我们希望模型生成的内容,以及我们在训练过程中计算权重更新损失所需的内容。也就是说,我们修改了自定义归并函数,以返 回目标 token ID,除了输入 token ID 之外。
与我们用来预训练LLM的过程类似,目标令牌ID与输入令牌ID相匹配,但向右移动了 一个位置。正如图7.10所示,这种设置使得LLM能够学习如何预测序列中的下一个令 牌。
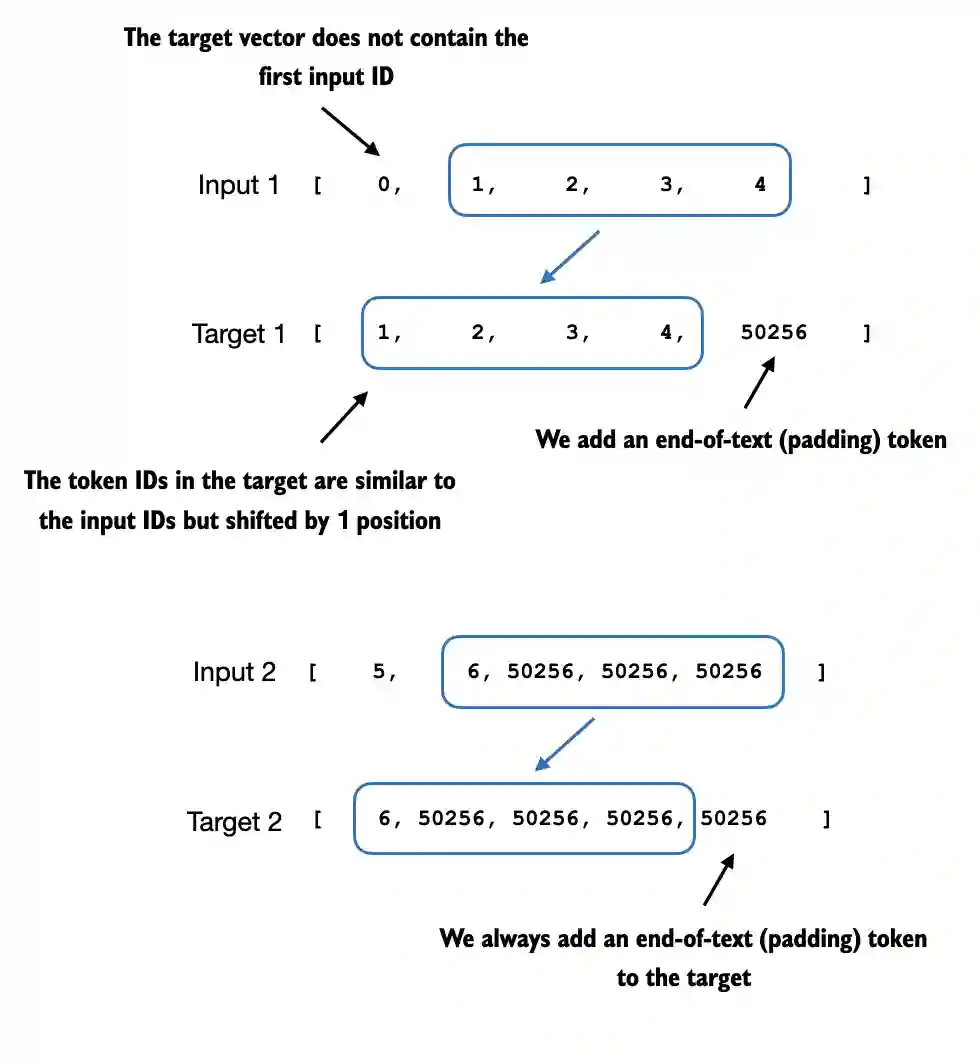
图 7.10 在LLM的指令微调过程中使用的输入和目标标记对齐。对于每个输入序 列,通过将标记ID向右移动一个位置、忽略输入的第一个标记并附加一个文本 结束标记来创建相应的目标序列。
以下更新的合并函数根据输入的令牌 ID 生成目标令牌 ID:
def custom_collate_draft_2(
    batch,
    pad_token_id=50256,
    device="cpu"
):
    # Find the longest sequence in the batch
    batch_max_length = max(len(item)+1 for item in batch)

    # Pad and prepare inputs
    inputs_lst, targets_lst = [], []

    for item in batch:
        new_item = item.copy()
        # Add an <|endoftext|> token
        new_item += [pad_token_id]
        # Pad sequences to max_length
        padded = (
            new_item + [pad_token_id] *
            (batch_max_length - len(new_item))
        )
        inputs = torch.tensor(padded[:-1])  # Truncate the last token for inputs
        targets = torch.tensor(padded[1:])  # Shift +1 to the right for targets
        inputs_lst.append(inputs)
        targets_lst.append(targets)

    # Convert list of inputs to tensor and transfer to target device
    inputs_tensor = torch.stack(inputs_lst).to(device)
    targets_tensor = torch.stack(targets_lst).to(device)
    return inputs_tensor, targets_tensor


inputs, targets = custom_collate_draft_2(batch)
print(inputs)
print(targets)

## output
tensor([[    0,     1,     2,     3,     4],
        [    5,     6, 50256, 50256, 50256],
        [    7,     8,     9, 50256, 50256]])
tensor([[    1,     2,     3,     4, 50256],
        [    6, 50256, 50256, 50256, 50256],
        [    8,     9, 50256, 50256, 50256]])
在接下来的步骤中,我们将所有填充标记赋值为 -100 占位符,如图 7.11 所示。
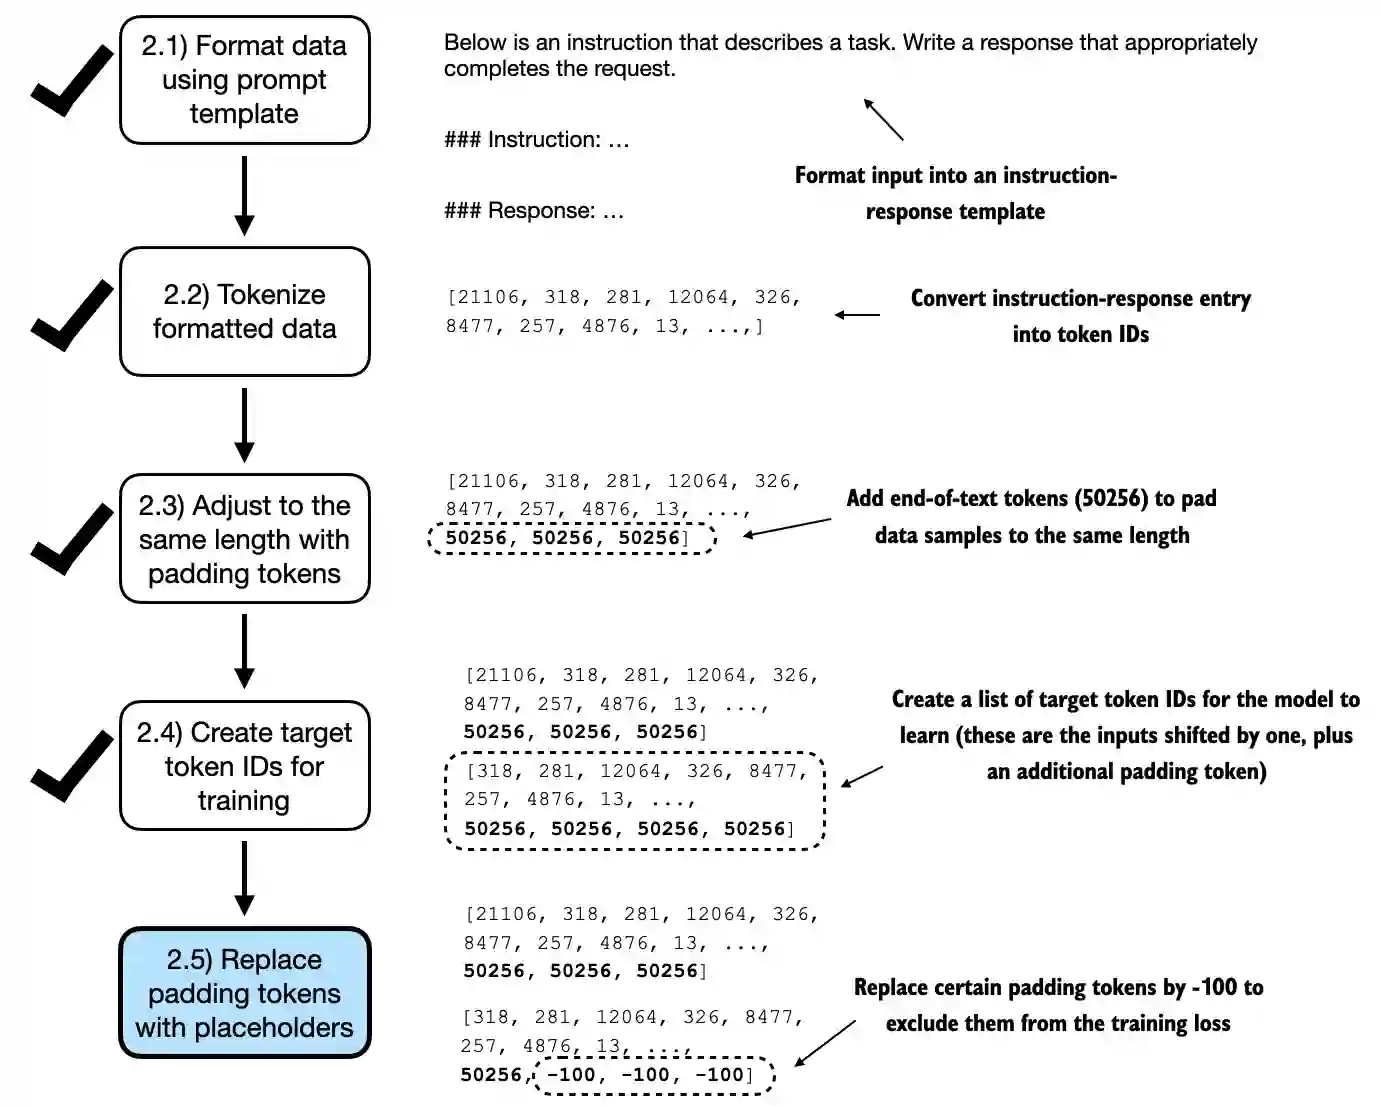
图 7.11 实施批处理过程的五个子步骤。在通过将标记 ID 向右移动一个位置并附加结束文本标记来创建 目标序列后,在步骤 2.5 中,我们用占位符值 (-100) 替换结束文本填充标记。
这个特殊值使我们能够将这些填充标记排除在训练损失计算之外,从而确保只有有意义的数据影响模型学习。我们将在实现此修改后更详细地讨论这个过程。(在进行分类微调时,我们不必担心这一点,因为我们只是根据最后的输出标记训练模型。)
然而,请注意,我们在目标列表中保留一个文本结束标记,ID 50256,如图7.12所 示。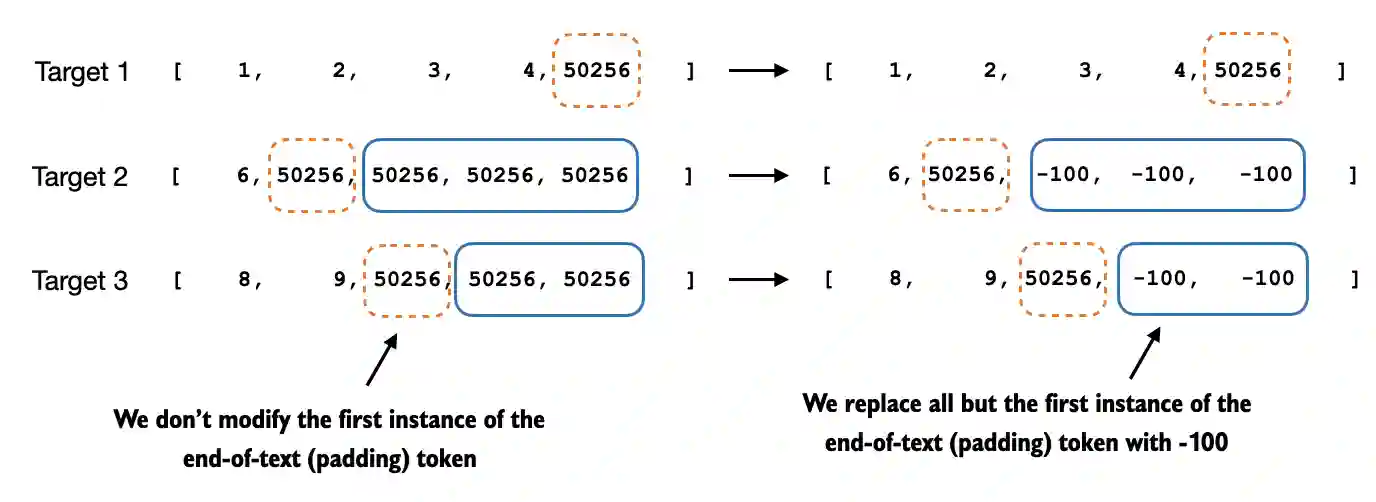
图 7.12 训练数据准备中目标批次的标记替换过程的步骤 2.4。我们用占位符值 -100 替换所有但第一个文本结束标记实例,以此作为填充,同时在每个目标序列中保留初始的文本结束标记。
保留它可以使LLM学习何时根据指令生成文本结束标记,我们将其用作生成的响应已完成的指示器。
在以下列表中,我们修改了自定义合并函数,以在目标列表中将 ID 50256 的标替换为 -100。此外,我们引入了一个 allowed_max_length 参数,以可选的方式限制样 本的长度。如果您计划使用超出 GPT-2 模型所支持的 1,024 令牌上下文大小的数据集 ,那么此调整将会很有用。
def custom_collate_fn(
    batch,
    pad_token_id=50256,
    ignore_index=-100,
    allowed_max_length=None,
    device="cpu"
):
    # Find the longest sequence in the batch
    batch_max_length = max(len(item)+1 for item in batch)

    # Pad and prepare inputs and targets
    inputs_lst, targets_lst = [], []

    for item in batch:
        new_item = item.copy()
        # Add an <|endoftext|> token
        new_item += [pad_token_id]
        # Pad sequences to max_length
        padded = (
            new_item + [pad_token_id] *
            (batch_max_length - len(new_item))
        )
        inputs = torch.tensor(padded[:-1])  # Truncate the last token for inputs
        targets = torch.tensor(padded[1:])  # Shift +1 to the right for targets

        # New: Replace all but the first padding tokens in targets by ignore_index
        mask = targets == pad_token_id
        indices = torch.nonzero(mask).squeeze()
        if indices.numel() > 1:
            targets[indices[1:]] = ignore_index

        # New: Optionally truncate to maximum sequence length
        if allowed_max_length is not None:
            inputs = inputs[:allowed_max_length]
            targets = targets[:allowed_max_length]

        inputs_lst.append(inputs)
        targets_lst.append(targets)

    # Convert list of inputs and targets to tensors and transfer to target device
    inputs_tensor = torch.stack(inputs_lst).to(device)
    targets_tensor = torch.stack(targets_lst).to(device)

    return inputs_tensor, targets_tensor


inputs, targets = custom_collate_fn(batch)
print(inputs)
print(targets)

## output
tensor([[    0,     1,     2,     3,     4],
        [    5,     6, 50256, 50256, 50256],
        [    7,     8,     9, 50256, 50256]])
tensor([[    1,     2,     3,     4, 50256],
        [    6, 50256,  -100,  -100,  -100],
        [    8,     9, 50256,  -100,  -100]])
Why change placeholder token ID
修改后的 collate 函数按预期工作,通过插入令牌 ID -100 来改变目标列表。这个调整背后的逻辑是什么?让我们探讨一下这个修改的潜在目的。
为了演示目的,考虑以下简单且自包含的示例,其中每个输出 logit 对应于模型词 汇表中的潜在令牌。以下是我们在模型预测一系列令牌时,如何计算引入的交 叉熵损失 的过程,这与我们在预训练模型并对其进行分类微调时所做的类似.
logits_1 = torch.tensor(
    [[-1.0, 1.0],  # 1st training example
     [-0.5, 1.5]]  # 2nd training example
)
targets_1 = torch.tensor([0, 1])

loss_1 = torch.nn.functional.cross_entropy(logits_1, targets_1)
print(loss_1)

## output
tensor(1.1269)
正如我们所预期的,添加一个额外的令牌ID会影响损失计算:
logits_2 = torch.tensor(
    [[-1.0, 1.0],
     [-0.5, 1.5],
     [-0.5, 1.5]]  # New 3rd training example
)
targets_2 = torch.tensor([0, 1, 1])

loss_2 = torch.nn.functional.cross_entropy(logits_2, targets_2)
print(loss_2)

## output
tensor(0.7936)
到目前为止,我们已经在 PyTorch 中使用交叉熵损失函数进行了一些或多或少明显 的示例计算,这也是我们在分类的预训练和微调的训练函数中使用的相同损失函数。 现在让我们进入有趣的部分,看看如果我们将第三个目标令牌 ID 替换为 -100 会发生 什么:
targets_3 = torch.tensor([0, 1, -100])

loss_3 = torch.nn.functional.cross_entropy(logits_2, targets_3)
print(loss_3)
print("loss_1 == loss_3:", loss_1 == loss_3)

## output
tensor(1.1269)
loss_1 == loss_3: tensor(True)
这三个训练样本的损失与我们之前从两个训练样本计算的损失完全相同。换句话说, 交叉熵损失函数忽略了 targets_3 向量中与 -100 对应的第三个条目(令牌 ID)。
那么,-100有什么特别之处,以至于它被交叉熵损失忽略?
PyTorch中交叉熵函数的默认设置是cross_entropy(..., ignore_index=-100)。这意味着它忽略标记为-100的目标。
我们利用这个ignore_index来忽略我们用来填充训练示例以使每个批次具有相同长度 的额外结束文本(填充)标记。然而,我们希望在目标中保留一个50256(结束文本 )令牌ID,因为它有助于LLM学习生成结束文本令牌,我们可以将其用作响应完整的指示器。
除了屏蔽填充令牌外,通常还会屏蔽与指令对应的目标令牌 ID,如图 7.13 所示。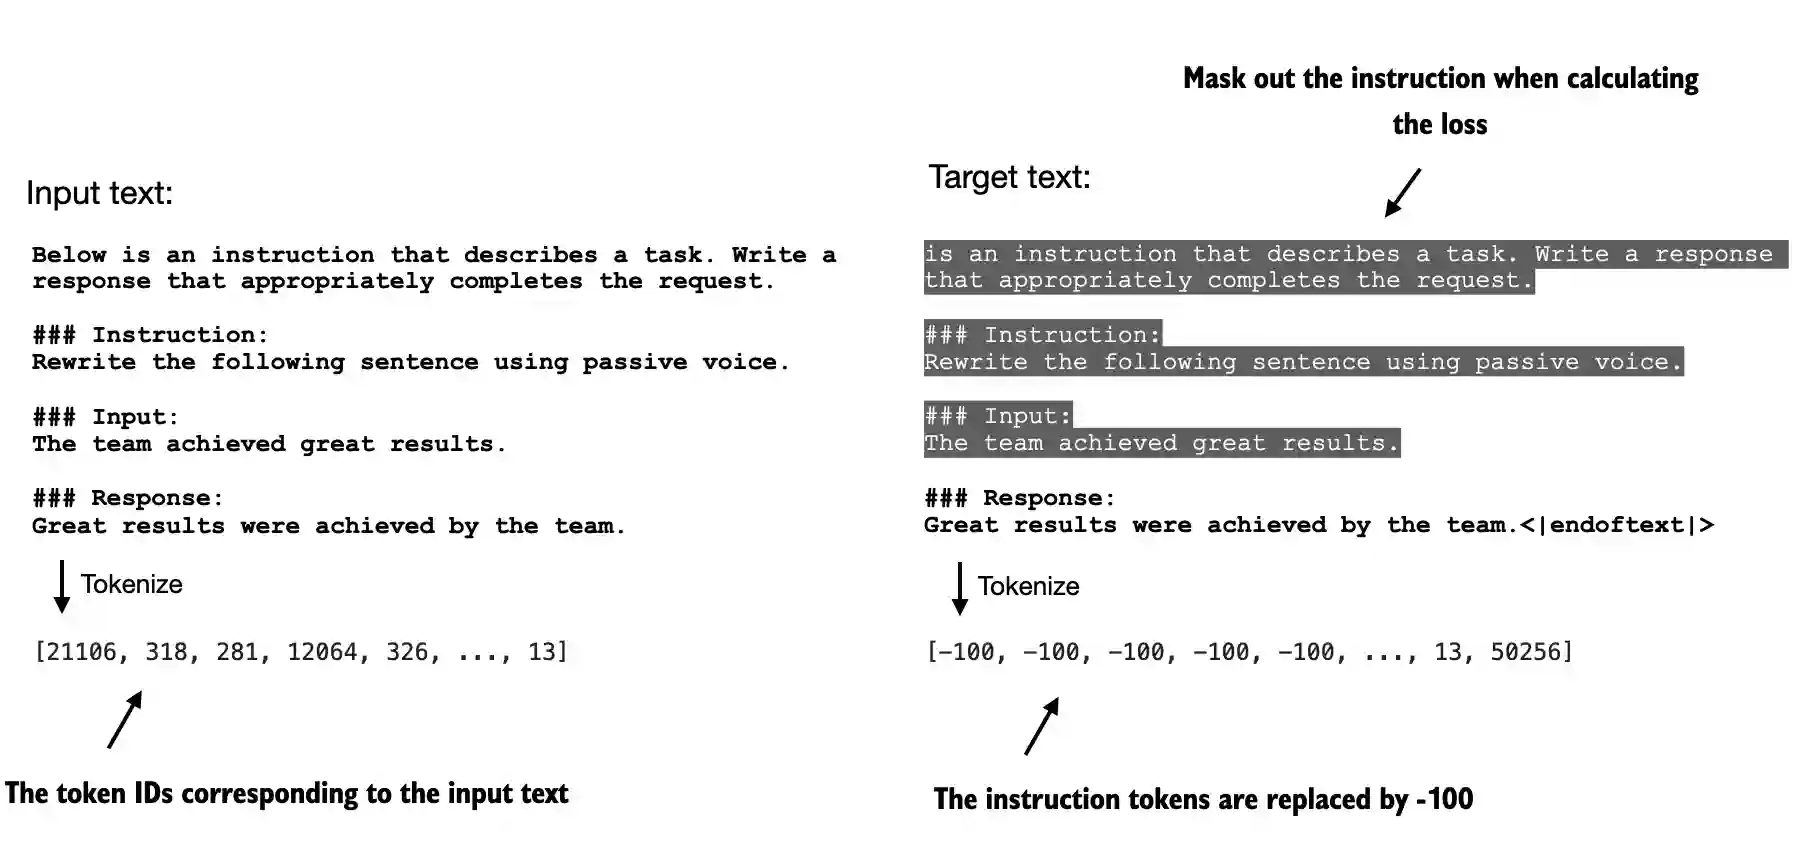
图 7.13 左:我们将格式化的输入文本进行分词,然后在训练过程中提供给 LLM。右:我们为 LLM 准备的目标文 本,其中我们可以选择性地掩盖指令部分,这意味着用 -100 ignore_index 值替换相应的 token ID。
通过屏蔽与指令对应的 LLM 目标令牌 ID,交叉熵损失仅针对生成的响应目标 ID 进行计算。因此,模型被训练为专注于生成准确的响应,而不是记忆指令,这有助于降低过拟合。
截至本文撰写时,研究人员对在指令微调期间遮蔽指令是否普遍有益存在分歧。例如 ,2024年Shi等人发表的论文“指令微调与指令损失”(https://arxiv.org/abs/2405.14394 )展示了不遮蔽指令对LLM性能的益处(。在这里,我们将不应用遮蔽,留给感兴趣的读者作为可选练习。
Creating data loaders for an instruction dataset
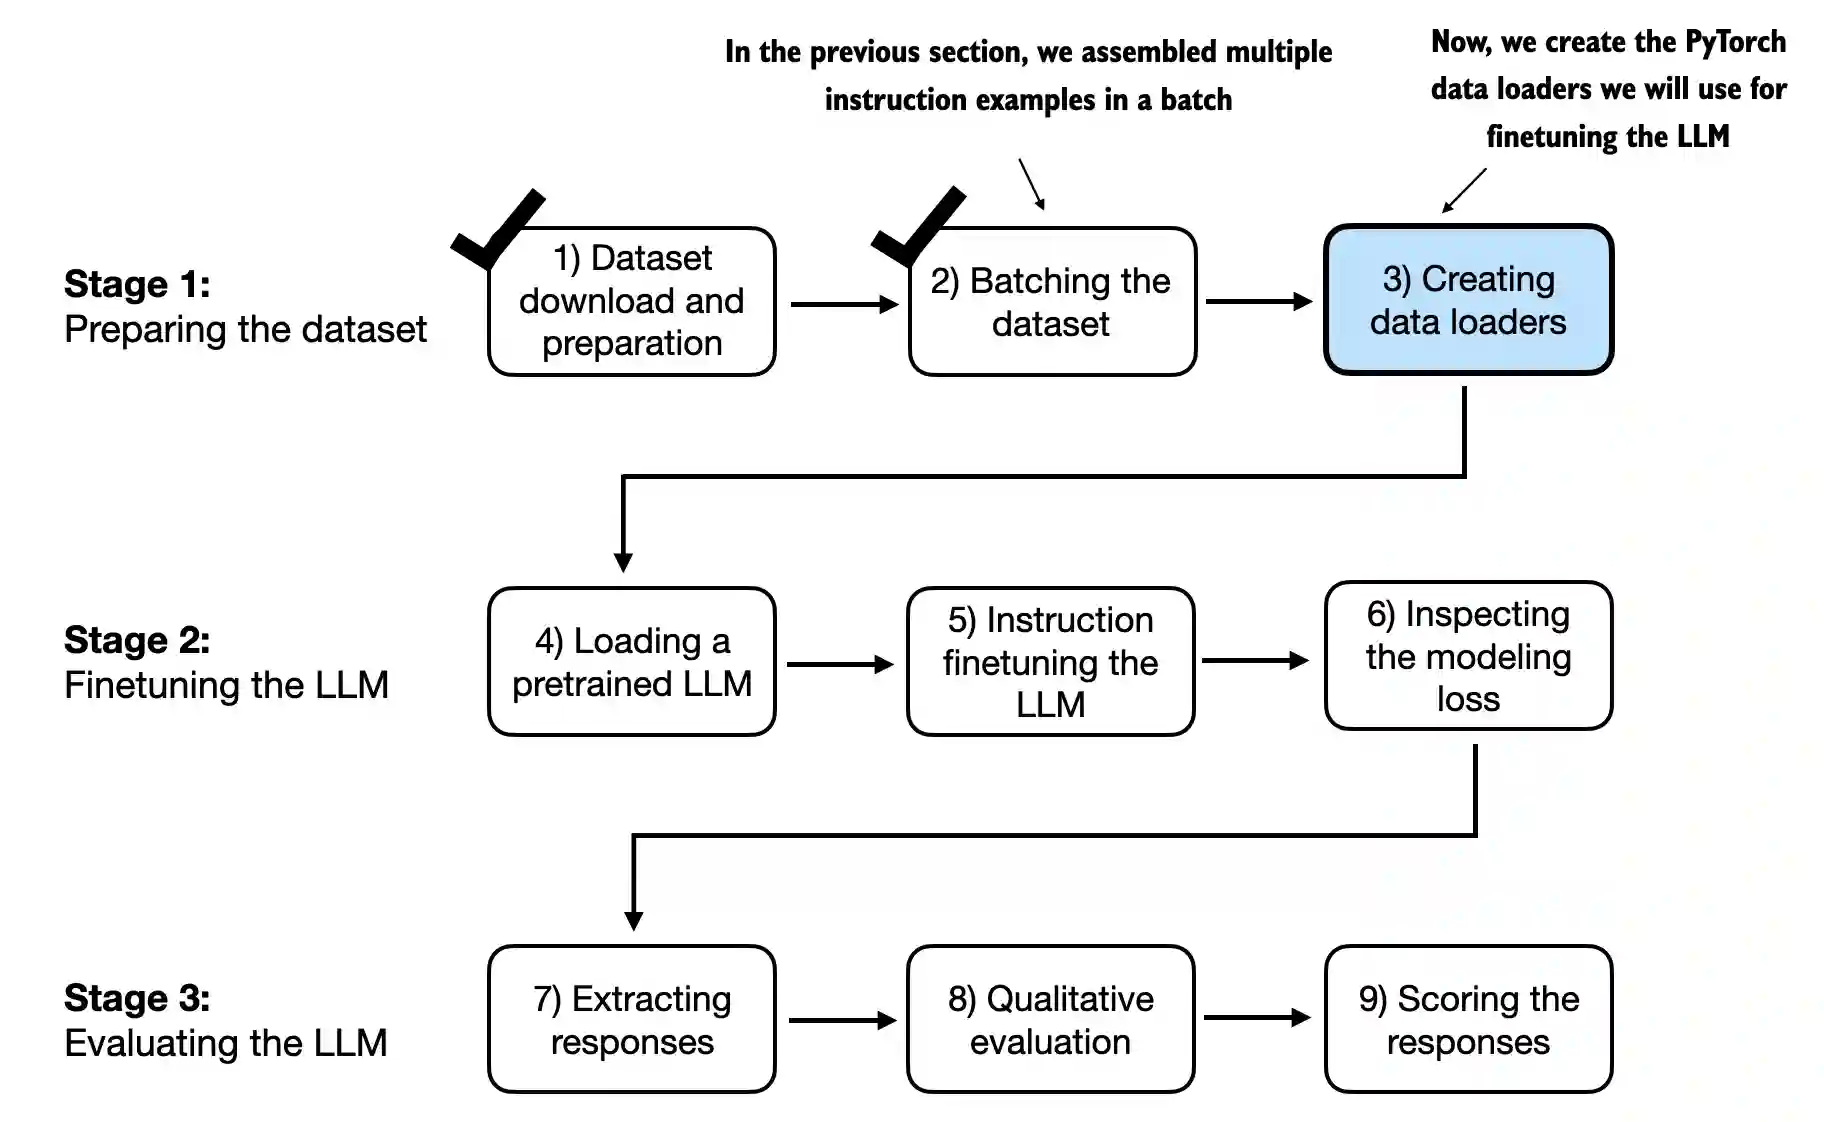
图7.14 用于指令微调LLM的三阶段过程。
我们已经完成了几个阶段,以实现InstructionDataset类和用于指令数据集的custom_collate_fn函数。如图7.14所示,我们准备通过将两个InstructionDataset对象和custom_collate_fn函数简单地插入PyTorch数据加载器中来收获我们的劳动成果。
这些加载器将自动洗牌并组织批次,以便进行LLM指令微调过程。
以前,我们在主训练循环中将数据移动到目标设备(例如,设备=为"cuda"时的GPU内 存)。将此作为collate函数的一部分,提供了将设备传输过程作为背景进程在训练循 环之外执行的优点,从而防止其在模型训练期间阻塞GPU。
device = torch.device("cuda" if torch.cuda.is_available() else "cpu")

# Note:
# Uncommenting the following lines will allow the code to run on Apple Silicon chips, if applicable,
# which is much faster than on an Apple CPU (as measured on an M3 MacBook Air).
# However, the resulting loss values may be slightly different.

#if torch.cuda.is_available():
#    device = torch.device("cuda")
#elif torch.backends.mps.is_available():
#    device = torch.device("mps")
#else:
#    device = torch.device("cpu")

print("Device:", device)
接下来,为了在将所选设备设置插入PyTorch DataLoader类时在custom_collate_fn中重用它,我们使用Python的functools标准库中的partial函数来创建一个新的函数版本, 并预先填充设备参数。此外,我们将allowed_max_length设置为1024,这将数据截断到 GPT-2模型支持的最大上下文长度,我们稍后将对其进行微调:
from functools import partial

customized_collate_fn = partial(
    custom_collate_fn,
    device=device,
    allowed_max_length=1024
)
接下来,我们可以像以前一样设置数据加载器,但这次我们将使用自定义的合并函数 进行批处理过程。
from torch.utils.data import DataLoader

num_workers = 0
batch_size = 8

torch.manual_seed(123)

train_dataset = InstructionDataset(train_data, tokenizer)
train_loader = DataLoader(
    train_dataset,
    batch_size=batch_size,
    collate_fn=customized_collate_fn,
    shuffle=True,
    drop_last=True,
    num_workers=num_workers
)


val_dataset = InstructionDataset(val_data, tokenizer)
val_loader = DataLoader(
    val_dataset,
    batch_size=batch_size,
    collate_fn=customized_collate_fn,
    shuffle=False,
    drop_last=False,
    num_workers=num_workers
)

test_dataset = InstructionDataset(test_data, tokenizer)
test_loader = DataLoader(
    test_dataset,
    batch_size=batch_size,
    collate_fn=customized_collate_fn,
    shuffle=False,
    drop_last=False,
    num_workers=num_workers
)
让我们检查训练加载器生成的输入和目标批次的维度:
print("Train loader:")
for inputs, targets in train_loader:
    print(inputs.shape, targets.shape)

## output
Train loader:
torch.Size([8, 61]) torch.Size([8, 61])
torch.Size([8, 76]) torch.Size([8, 76])
torch.Size([8, 73]) torch.Size([8, 73])
torch.Size([8, 68]) torch.Size([8, 68])
torch.Size([8, 65]) torch.Size([8, 65])
torch.Size([8, 72]) torch.Size([8, 72])
torch.Size([8, 80]) torch.Size([8, 80])
torch.Size([8, 67]) torch.Size([8, 67])
torch.Size([8, 62]) torch.Size([8, 62])
torch.Size([8, 75]) torch.Size([8, 75])
torch.Size([8, 62]) torch.Size([8, 62])
torch.Size([8, 68]) torch.Size([8, 68])
torch.Size([8, 67]) torch.Size([8, 67])
torch.Size([8, 77]) torch.Size([8, 77])
torch.Size([8, 69]) torch.Size([8, 69])
torch.Size([8, 79]) torch.Size([8, 79])
torch.Size([8, 71]) torch.Size([8, 71])
torch.Size([8, 66]) torch.Size([8, 66])
torch.Size([8, 83]) torch.Size([8, 83])
torch.Size([8, 68]) torch.Size([8, 68])
torch.Size([8, 80]) torch.Size([8, 80])
torch.Size([8, 71]) torch.Size([8, 71])
torch.Size([8, 69]) torch.Size([8, 69])
torch.Size([8, 65]) torch.Size([8, 65])
torch.Size([8, 68]) torch.Size([8, 68])
torch.Size([8, 60]) torch.Size([8, 60])
torch.Size([8, 59]) torch.Size([8, 59])
torch.Size([8, 69]) torch.Size([8, 69])
torch.Size([8, 63]) torch.Size([8, 63])
torch.Size([8, 65]) torch.Size([8, 65])
torch.Size([8, 76]) torch.Size([8, 76])
torch.Size([8, 66]) torch.Size([8, 66])
torch.Size([8, 71]) torch.Size([8, 71])
torch.Size([8, 91]) torch.Size([8, 91])
torch.Size([8, 65]) torch.Size([8, 65])
torch.Size([8, 64]) torch.Size([8, 64])
torch.Size([8, 67]) torch.Size([8, 67])
torch.Size([8, 66]) torch.Size([8, 66])
torch.Size([8, 64]) torch.Size([8, 64])
torch.Size([8, 65]) torch.Size([8, 65])
torch.Size([8, 75]) torch.Size([8, 75])
torch.Size([8, 89]) torch.Size([8, 89])
torch.Size([8, 59]) torch.Size([8, 59])
torch.Size([8, 88]) torch.Size([8, 88])
torch.Size([8, 83]) torch.Size([8, 83])
torch.Size([8, 83]) torch.Size([8, 83])
torch.Size([8, 70]) torch.Size([8, 70])
torch.Size([8, 65]) torch.Size([8, 65])
torch.Size([8, 74]) torch.Size([8, 74])
torch.Size([8, 76]) torch.Size([8, 76])
torch.Size([8, 67]) torch.Size([8, 67])
torch.Size([8, 75]) torch.Size([8, 75])
torch.Size([8, 83]) torch.Size([8, 83])
torch.Size([8, 69]) torch.Size([8, 69])
torch.Size([8, 67]) torch.Size([8, 67])
torch.Size([8, 60]) torch.Size([8, 60])
torch.Size([8, 60]) torch.Size([8, 60])
torch.Size([8, 66]) torch.Size([8, 66])
torch.Size([8, 80]) torch.Size([8, 80])
torch.Size([8, 71]) torch.Size([8, 71])
torch.Size([8, 61]) torch.Size([8, 61])
torch.Size([8, 58]) torch.Size([8, 58])
torch.Size([8, 71]) torch.Size([8, 71])
torch.Size([8, 67]) torch.Size([8, 67])
torch.Size([8, 68]) torch.Size([8, 68])
torch.Size([8, 63]) torch.Size([8, 63])
torch.Size([8, 87]) torch.Size([8, 87])
torch.Size([8, 68]) torch.Size([8, 68])
torch.Size([8, 64]) torch.Size([8, 64])
torch.Size([8, 68]) torch.Size([8, 68])
torch.Size([8, 71]) torch.Size([8, 71])
torch.Size([8, 68]) torch.Size([8, 68])
torch.Size([8, 71]) torch.Size([8, 71])
torch.Size([8, 61]) torch.Size([8, 61])
torch.Size([8, 65]) torch.Size([8, 65])
torch.Size([8, 67]) torch.Size([8, 67])
torch.Size([8, 65]) torch.Size([8, 65])
torch.Size([8, 64]) torch.Size([8, 64])
torch.Size([8, 60]) torch.Size([8, 60])
torch.Size([8, 72]) torch.Size([8, 72])
torch.Size([8, 64]) torch.Size([8, 64])
torch.Size([8, 70]) torch.Size([8, 70])
torch.Size([8, 57]) torch.Size([8, 57])
torch.Size([8, 72]) torch.Size([8, 72])
torch.Size([8, 64]) torch.Size([8, 64])
torch.Size([8, 68]) torch.Size([8, 68])
torch.Size([8, 62]) torch.Size([8, 62])
torch.Size([8, 74]) torch.Size([8, 74])
torch.Size([8, 80]) torch.Size([8, 80])
torch.Size([8, 68]) torch.Size([8, 68])
torch.Size([8, 70]) torch.Size([8, 70])
torch.Size([8, 91]) torch.Size([8, 91])
torch.Size([8, 61]) torch.Size([8, 61])
torch.Size([8, 66]) torch.Size([8, 66])
torch.Size([8, 80]) torch.Size([8, 80])
torch.Size([8, 81]) torch.Size([8, 81])
torch.Size([8, 74]) torch.Size([8, 74])
torch.Size([8, 82]) torch.Size([8, 82])
torch.Size([8, 63]) torch.Size([8, 63])
torch.Size([8, 83]) torch.Size([8, 83])
torch.Size([8, 68]) torch.Size([8, 68])
torch.Size([8, 67]) torch.Size([8, 67])
torch.Size([8, 77]) torch.Size([8, 77])
torch.Size([8, 91]) torch.Size([8, 91])
torch.Size([8, 64]) torch.Size([8, 64])
torch.Size([8, 61]) torch.Size([8, 61])
torch.Size([8, 75]) torch.Size([8, 75])
torch.Size([8, 64]) torch.Size([8, 64])
torch.Size([8, 66]) torch.Size([8, 66])
torch.Size([8, 78]) torch.Size([8, 78])
torch.Size([8, 66]) torch.Size([8, 66])
torch.Size([8, 64]) torch.Size([8, 64])
torch.Size([8, 83]) torch.Size([8, 83])
torch.Size([8, 66]) torch.Size([8, 66])
torch.Size([8, 74]) torch.Size([8, 74])
torch.Size([8, 69]) torch.Size([8, 69])
该输出显示第一个输入和目标批次的维度为8 × 61,其中8表示批次大小,61是该批次 中每个训练示例的令牌数。第二个输入和目标批次的令牌数不同,例如,76。多亏了 我们自定义的聚合函数,数据加载器能够创建不同长度的批次。